Linux 提供了无数的命令和实用程序,可帮助您快速有效地执行系统管理任务。
作为系统管理员,您的工作包括安装和运行软件、控制访问、监控、确保可用性、备份、恢复备份,当然还有救火。 😜
在本文中,我们将回顾 Linux 系统管理员在日常工作中经常使用的一些命令。
取消命名
要打印系统信息,请使用带有-a标志的uname命令。此命令显示内核名称、内核版本、内核版本、主机名、处理器类型和硬件平台信息。
 ubuntu@ubuntu18:~$ uname -a
Linux ubuntu18 5.3.0-1028-azure #29~18.04.1-Ubuntu SMP Fri Jun 5 14:32:34 UTC 2020 x86_64 x86_64 x86_64 GNU/Linux
这意味着什么:
 kernel name:Linux
hostname: ubuntu18
kernel release: 5.3.0-1028-azure
kernel version: #29~18.04.1-Ubuntu SMP Fri Jun 5 14:32:34 UTC 2020
machine hardware name: x86_64
processor: x86_64
hardware-platform: x86_64
operating system: GNU/Linux 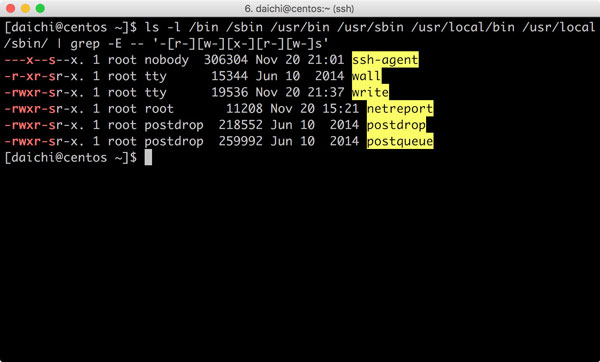
D.F.
使用df命令检查文件系统大小和可用空间。单独使用时,此命令以1K块显示输出。
 ubuntu@ubuntu18:~$ df
Filesystem     1K-blocks    Used Available Use% Mounted on
udev              437208       0    437208   0% /dev
tmpfs              91100     692     90408   1% /run
/dev/sda1       30309264 2383952  27908928   8% /
....
选项-h以人类可读的格式( MB和GB显示输出。
 ubuntu@ubuntu18:~$ df -h
Filesystem      Size  Used Avail Use% Mounted on
udev            427M     0  427M   0% /dev
tmpfs            89M  692K   89M   1% /run
/dev/sda1        29G  2.3G   27G   8% /
tmpfs           445M     0  445M   0% /dev/shm
tmpfs           5.0M     0  5.0M   0% /run/lock
tmpfs           445M     0  445M   0% /sys/fs/cgroup
/dev/sda15      105M  3.6M  101M   4% /boot/efi
/dev/sdb1       3.9G   16M  3.7G   1% /mnt
tmpfs            89M     0   89M   0% /run/user/1001
要忽略 tmpfs 等文件系统,请使用标志-x以获得更清晰的输出。
 ubuntu@ubuntu18:~$ df -h -x tmpfs
Filesystem      Size  Used Avail Use% Mounted on
udev            427M     0  427M   0% /dev
/dev/sda1        29G  2.3G   27G   8% /
/dev/sda15      105M  3.6M  101M   4% /boot/efi
/dev/sdb1 3.9G 16M 3.7G 1% /mnt使用-t标志仅列出特定的文件系统类型。例如,仅显示 ext4 文件系统:
 ubuntu@ubuntu18:~$ df -h -t ext4
Filesystem      Size  Used Avail Use% Mounted on
/dev/sda1        29G  2.3G   27G   8% /
/dev/sdb1       3.9G   16M  3.7G   1% /mnt
总计标志添加一行显示总计。
 ubuntu@ubuntu18:~$ df -h -t ext4 --total
Filesystem      Size  Used Avail Use% Mounted on
/dev/sda1        29G  2.3G   27G   8% /
/dev/sdb1       3.9G   16M  3.7G   1% /mnt
<b>total 33G 2.3G 31G 8% -</b> 
杜
要检查目录中的磁盘空间使用情况,请使用du命令。例如,检查/var/log目录中的磁盘空间使用情况。使用-h标志使其易于阅读。
 ubuntu@ubuntu18:~$ sudo du -h /var/log
24K	/var/log/Microsoft/Azure/NetworkWatcherAgent/Logs
28K	/var/log/Microsoft/Azure/NetworkWatcherAgent
32K	/var/log/Microsoft/Azure
36K	/var/log/Microsoft
60K	/var/log/apt
4.0K	/var/log/samba
177M	/var/log/journal/0f4f926f583b4691af7de11025b19ff6
177M	/var/log/journal
...
204M /var/log要仅显示总使用情况,请仅使用-s (摘要)标志。
 ubuntu@ubuntu18:~$ sudo du -hs /var/log
204M /var/log 
自由的
使用 free 命令查看系统总内存、已用内存和可用系统内存。使用-h标志使其易于阅读。
 ubuntu@ubuntu18:~$ free -h
              total        used        free      shared  buff/cache   available
Mem:           889M        272M        100M        712K        517M        443M
Swap:            0B          0B          0B
total - Total installed memory (memtotal + swaptotal)
used - used memory
free - unused memory (memfree + swapfree)
buffers - memory used by kernel buffers
cache - memory used by page caches
buff/cache - sum of buffers and cache
available - Estimated memory available for starting new applications, without swapping 
附注
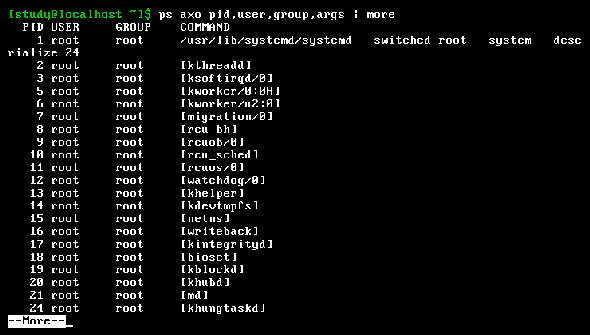
使用ps显示有关系统上运行的进程的状态信息。要查看用户 ubuntu 拥有的所有进程,请使用-u标志和用户名。
 ubuntu@ubuntu18:~$ ps -u ubuntu
   PID TTY          TIME CMD
  7804 ?        00:00:00 systemd
  7805 ?        00:00:00 (sd-pam)
  7940 ?        00:00:00 sshd
  7941 pts/0    00:00:00 bash
  8111 ?        00:00:00 sshd
  8112 pts/1    00:00:00 bash
 13868 ?        00:00:00 sshd
 13869 pts/2    00:00:00 bash
 13885 pts/0    00:00:00 man
 13895 pts/0    00:00:00 pager
 18111 pts/2    00:00:00 man
 18121 pts/2    00:00:00 pager
 18485 pts/1    00:00:00 ps
使用 aux 标志运行 ps 以查看所有进程。
 ubuntu@ubuntu18:~$ ps aux
USER        PID %CPU %MEM    VSZ   RSS TTY      STAT START   TIME COMMAND
root          1  0.0  0.7 160076  7020 ?        Ss   Jun29   0:34 /sbin/init
root          2  0.0  0.0      0     0 ?        S    Jun29   0:00 [kthreadd]
root          3  0.0  0.0      0     0 ?        I<   Jun29   0:00 [rcu_gp]
root          4  0.0  0.0      0     0 ?        I<   Jun29   0:00 [rcu_par_gp]
root          6  0.0  0.0      0     0 ?        I<   Jun29   0:00 [kworker/0:0H-kb]
....
在哪里
| 标题 | 意义 |
| PID | 过程识别号 |
| %中央处理器 | 进程使用的CPU时间百分比 |
| %MEM | 进程使用的 RAM 百分比 |
| VSZ | 使用的虚拟内存 (KB) |
| RSS | 进程使用的物理内存(KB) |
| 电传打字机 | 与进程关联的终端 |
| 地位 | R – 运行或准备运行、S – 睡眠、I – 空闲、T – 停止、Z – 僵尸、D – 等待磁盘 I/O、X – 死机、W – 换出、N – 低优先级进程、< –高优先级进程 |
多于
ps命令始终显示进程状态的快照,而 top 显示按进程活动排序的持续更新的系统进程列表(默认情况下每 3 秒一次)。
top命令输出由两个主要部分组成。顶部的系统概述和按 CPU 活动排序的进程表。
 top - 14:25:32 up 44 days, 11:37,  1 user,  load average: 0.00, 0.00, 0.00
Tasks: 114 total,   1 running,  59 sleeping,   0 stopped,   0 zombie
%Cpu(s):  0.3 us,  0.0 sy,  0.0 ni, 99.7 id,  0.0 wa,  0.0 hi,  0.0 si,  0.0 st
KiB Mem :   910992 total,   101208 free,   274712 used,   535072 buff/cache
KiB Swap:        0 total,        0 free,        0 used.   458492 avail Mem

   PID USER      PR  NI    VIRT    RES    SHR S %CPU %MEM     TIME+ COMMAND
 50497 ubuntu    20   0   44528   3944   3368 R  0.7  0.4   0:00.15 top
     1 root      20   0  160076   7020   4400 S  0.0  0.8   0:34.85 systemd
     2 root      20   0       0      0      0 S  0.0  0.0   0:00.08 kthreadd
     3 root       0 -20       0      0      0 I  0.0  0.0   0:00.00 rcu_gp
     4 root       0 -20       0      0      0 I  0.0  0.0   0:00.00 rcu_par_gp
     6 root       0 -20       0      0      0 I  0.0  0.0   0:00.00 kworker/0:+
     9 root       0 -20       0      0      0 I  0.0  0.0   0:00.00 mm_percpu_+
系统概述中的一些字段包括:
| 多于 | 营业时间。自机器上次启动以来经过的时间。 | ||||||||||||||||
| 平均负载 | 平均负载是指等待运行的进程数。值小于 1.0 表示机器不忙。共有三个值。第一个是过去 60 秒的平均值,第二个是过去 5 分钟的平均值,第三个是过去 15 分钟的平均值。 | ||||||||||||||||
| %CPU(秒) | 该行描述了 CPU 活动。
|
进程表中的字段有:
| PID | 过程识别号 |
| 用户 | 流程所有者 |
| 公关 | 优先事项 |
| NI. | 物有所值 |
| 虚拟性 | 进程使用的虚拟内存(KB) |
| 较少的 | 进程使用的物理内存 |
| SHR | 进程使用的共享内存 |
| S | 进程状态。 R – 运行、S – 睡眠、I – 空闲、T – 停止、Z – 僵尸、D – 等待磁盘 I/O、W – 换出、X – 死机 |
| %中央处理器 | 进程使用的CPU时间百分比 |
| %MEM | 进程使用的物理内存 |
| 时间 [+] | 进程使用的总 CPU 时间 |
| 指示 | 程序名称 |
当top运行时,您可以发出各种命令。按h或?查看运行 top 时可以运行的命令。按k终止该进程。按q退出顶部。
挖
dig是最好的 DNS 查询工具。使用方法如下:
dig <DNS server> <domain> <query-type>在哪里
- <DNS 服务器> 是要查询的 DNS 服务器名称。
- <domain>是要查询的域名。
- <query-type> 是您想要了解的记录的名称(A、MX、NS SOA 等)。
使用 +short 标志来抑制详细输出。
要查看 google.com 的 A 记录,请使用以下命令:
 ubuntu@ubuntu18:~$ dig google.com +short
172.217.164.174
要查看 google.com 的 MX 记录,请使用以下命令:
 ubuntu@ubuntu18:~$ dig google.com MX  +short
50 alt4.aspmx.l.google.com.
10 aspmx.l.google.com.
20 alt1.aspmx.l.google.com.
40 alt3.aspmx.l.google.com.
30 alt2.aspmx.l.google.com.
如果您需要查询Internet上的DNS记录,可以使用DNS查找工具。
谁和我
显示who已登录。
 ubuntu@ubuntu18:~$ who
ubuntu   pts/0        2020-08-14 17:28 (183.83.211.129)
ubuntu pts/1 2020-08-14 17:58 (183.83.211.129) w表示当前登录的用户及其进程。标题显示当前时间、系统正常运行时间、登录用户数以及平均系统负载。
 ubuntu@ubuntu18:~$ w
 18:07:33 up 46 days, 15:19,  2 users,  load average: 0.00, 0.00, 0.00
USER     TTY      FROM             LOGIN@   IDLE   JCPU   PCPU WHAT
ubuntu   pts/0    183.83.211.129   17:28    2.00s  0.10s  0.00s w
ubuntu   pts/1    183.83.211.129   17:58    9:07   0.05s  0.01s vi
下一部分显示用户名、终端、您登录的远程IP、登录时间、空闲时间、JCPU、PCPU 以及您正在运行的程序。 JCPU是附加到tty的所有进程使用的时间,PCPU是当前进程使用的时间。
焦油
GNU tar 允许您将多个文件归档到一个文件中。
例如,创建目录 myfiles 并在 myfiles 目录中创建三个文件:a.txt、b.txt 和 c.txt。
ubuntu@ubuntu18:~$ mkdir myfiles ; touch myfiles/{a.txt,b.txt,c.txt}现在创建一个名为 allfiles.tar 的存档,其中包含 myfiles 目录中的所有文件。
 ubuntu@ubuntu18:~$ tar -cvf allfiles.tar myfiles
myfiles/
myfiles/c.txt
myfiles/a.txt
myfiles/b.txt
列出当前目录中的所有文件。您可以看到 myfiles 目录和 allfiles.tar 存档。
 ubuntu@ubuntu18:~$ ls
allfiles.tar  myfiles
您可以使用 -x 标志解压缩存档。解压 allfiles.tar:
 ubuntu@ubuntu18:~$ tar -xvf allfiles.tar
myfiles/
myfiles/c.txt
myfiles/a.txt
myfiles/b.txt
您还可以使用 -z 标志压缩此存档。这将创建一个 gzip 压缩存档。
 ubuntu@ubuntu18:~$ tar -zcvf allfiles.tar.gz myfiles
myfiles/
myfiles/c.txt
myfiles/a.txt
myfiles/b.txt
ubuntu@ubuntu18:~$ ls
allfiles.tar.gz myfiles使用-z和-x标志来解压缩压缩档案。
 ubuntu@ubuntu18:~$ tar -zxvf allfiles.tar.gz
myfiles/
myfiles/c.txt
myfiles/a.txt
myfiles/b.txt
grep
grep用于搜索一个文件或一组文件中的模式。打印与该模式匹配的所有行。例如,要在 /etc/apache2/apache2.conf 中搜索包含“ServerRoot”的行:
 ubuntu@ubuntu18:~$ grep ServerRoot /etc/apache2/apache2.conf
# ServerRoot: The top of the directory tree under which the server's
#ServerRoot "/etc/apache2"使用*搜索目录中的所有文件。要包括子目录搜索,请使用-r (递归)标志。因此,要在 /etc/apache2 中的所有文件中查找包含模式“VirtualHost”的所有行:
 ubuntu@ubuntu18:~$ cd /etc/apache2
ubuntu@ubuntu18:/etc/apache2$ grep -r VirtualHost *
apache2.conf:# If you do not specify an ErrorLog directive within a <VirtualHost>
apache2.conf:# logged here.  If you *do* define an error logfile for a <VirtualHost>
conf-available/localized-error-pages.conf:# even on a per-VirtualHost basis.  If you include the Alias in the global server
conf-available/other-vhosts-access-log.conf:# Define an access log for VirtualHosts that don't define their own logfile
ports.conf:# have to change the VirtualHost statement in
sites-available/000-default.conf:<VirtualHost *:80>
...
同步
<a href="https://.com/rsync-guide/">rsync</a> is a fast command-line tool for synchronizing files and directories between two locations. Can be used for both local and remote copying and is fast because it sends only the differences between the source files and the existing files in the destination.
它被广泛用作备份和日常使用的改进复制命令。
例如:
将 myfiles 目录中的所有文件复制/rsync 到备份目录:
 ubuntu@ubuntu18:~$ rsync -avh myfiles/ /backups
sending incremental file list
./
a.txt
b.txt
c.txt

sent 218 bytes  received 76 bytes  588.00 bytes/sec
total size is 0  speedup is 0.00
要将 myfiles 目录中的所有文件重新同步到远程主机上的备份目录,请在目标名称中包含remote_user @remote_host 。因此,要将 myfiles 文件夹同步到 IP 为 10.0.0.50 的远程主机,请执行以下操作:
 vagrant@ubuntu-xenial:~$ rsync -avh myfiles/ vagrant@10.0.0.50:/home/vagrant
vagrant@10.0.0.50's password:
sending incremental file list
./
a.txt
b.txt
c.txt

sent 230 bytes  received 76 bytes  47.08 bytes/sec
total size is 0  speedup is 0.00
SS
ss命令用于转储套接字统计信息,类似于传统的 netstat 实用程序。使用-t标志显示 TCP 套接字。
 ubuntu@ubuntu18:~$ ss -t
State       Recv-Q        Send-Q                 Local Address:Port                     Peer Address:Port
ESTAB       0             0                           10.0.0.4:53852                   168.63.129.16:8037
ESTAB       0             0                           10.0.0.4:ssh                    183.83.211.129:64118
ESTAB       0             0                           10.0.0.4:33256                 169.254.169.254:http
ESTAB       0             1080                        10.0.0.4:ssh                     222.186.30.35:11527
ESTAB 0 0 10.0.0.4:ssh 183.83.211.129:63049这不会显示哪些套接字正在监听。使用-t和-a标志来包括侦听和非侦听套接字。
 ubuntu@ubuntu18:~$ ss -t -a
State        Recv-Q        Send-Q                Local Address:Port                     Peer Address:Port
LISTEN       0             128                         0.0.0.0:ssh                           0.0.0.0:*
LISTEN       0             80                        127.0.0.1:mysql                         0.0.0.0:*
LISTEN       0             128                   127.0.0.53%lo:domain                        0.0.0.0:*
ESTAB        0             0                          10.0.0.4:53852                   168.63.129.16:8037
ESTAB        0             0                          10.0.0.4:ssh                    183.83.211.129:64118
ESTAB        0             0                          10.0.0.4:33256                 169.254.169.254:http
ESTAB        0             1080                       10.0.0.4:ssh                     222.186.30.35:11527
ESTAB        0             120                        10.0.0.4:ssh                    183.83.211.129:63049
LISTEN       0             128                            [::]:ssh                              [::]:*
LISTEN       0             128                               *:http                                *:*
寻找
locate命令使用数据库来查找文件,实际上比find命令快得多。使用起来非常简单,搜索apache2.conf等文件。
 ubuntu@ubuntu18:~$ locate apache2.conf
/etc/apache2/apache2.conf
/var/lib/dpkg/info/apache2.conffiles如果您只需要与搜索模式匹配的文件数量,则可以使用-c标志。
 ubuntu@ubuntu18:~$ locate -c apache2.conf
2在某些情况下,您可能需要刷新locate(mlocate)使用的数据库。要更新数据库,请使用updatedb命令。这需要超级用户权限。
ubuntu@ubuntu18:~$ sudo updatedb搜索
Linux 上最常用的命令之一。使用它可以根据文件名、权限、用户 ID、组 ID、大小、文件类型等条件搜索文件。
要按名称搜索当前目录中的文件,请使用 -name 标志,后跟要搜索的文件名。
 ubuntu@ubuntu18:~$ find . -name a.txt
./myfiles/a.txt使用-type d标志来搜索目录。
 ubuntu@ubuntu18:~$ find . -type d
.
./.ssh
./myfiles
./.cache
./.gnupg
./.gnupg/private-keys-v1.d
./docker
要按大小搜索文件(例如大于 20MB 的文件),请使用-size标志。
 ubuntu@ubuntu18:~$ find . -size +20M
./docker/docker-ce-cli_5%3a19.03.12~3-0~ubuntu-bionic_amd64.deb
./docker/docker-ce_5%3a19.03.12~3-0~ubuntu-bionic_amd64.deb
了解有关 Linux 查找命令的更多信息。
系统控制
现在systemd已经取代了大多数 Linux 发行版上的 SysV init 进程,可以使用 systemctl 命令来管理 systemd 服务和单元。
启动服务(例如 apache2):
ubuntu@ubuntu18:~$ sudo systemctl start apache2.service服务后缀可以省略。
停止服务:
ubuntu@ubuntu18:~$ sudo systemctl stop apache2使用systemctl status命令检查服务的状态。以下示例显示了 apache2 的运行状态。
 ubuntu@ubuntu18:~$ sudo systemctl status apache2
● apache2.service - The Apache HTTP Server
   Loaded: loaded (/lib/systemd/system/apache2.service; enabled; vendor preset: enabled)
  Drop-In: /lib/systemd/system/apache2.service.d
           └─apache2-systemd.conf
   Active: active (running) since Wed 2020-08-19 11:34:04 UTC; 2s ago
  Process: 25346 ExecStop=/usr/sbin/apachectl stop (code=exited, status=0/SUCCESS)
  Process: 18202 ExecReload=/usr/sbin/apachectl graceful (code=exited, status=0/SUCCESS)
  Process: 25536 ExecStart=/usr/sbin/apachectl start (code=exited, status=0/SUCCESS)
 Main PID: 25555 (apache2)
    Tasks: 55 (limit: 1024)
   CGroup: /system.slice/apache2.service
           ├─25555 /usr/sbin/apache2 -k start
           ├─25558 /usr/sbin/apache2 -k start
           └─25559 /usr/sbin/apache2 -k start

Aug 19 11:34:04 ubuntu18 systemd[1]: Starting The Apache HTTP Server...
Aug 19 11:34:04 ubuntu18 systemd[1]: Started The Apache HTTP Server.
ufw命令
UFW – Simple Firewall 是一个易于使用的 iptables 前端。默认情况下,它在基于 Ubuntu 的发行版上可用。在 CentOS 上,您可以从 EPEL 存储库安装ufw 。
启用 ufw:
$ sudo ufw enable使用 ufw status 检查防火墙状态。
 $ sudo ufw status
Status: active
默认 UFW 策略允许所有传出流量并阻止所有传入流量。
以下命令允许 HTTP 端口上的传入流量。
 $ sudo ufw allow http
Rule added
Rule added (v6)
您可以拒绝任何端口上的流量。以下示例阻止端口 21 上的流量:
 $ sudo ufw deny 21
Rule added
Rule added (v6)
日志控制
使用journalctl查看systemd收集的日志。 systemd 将二进制格式的日志收集到中央位置。要查看这些日志:
 ubuntu@ubuntu18:~$ sudo journalctl
-- Logs begin at Mon 2020-06-29 02:48:31 UTC, end at Wed 2020-08-19 15:07:59 UTC. --
Jun 29 02:48:31 ubuntu kernel: Linux version 5.3.0-1028-azure (buildd@lcy01-amd64-003) (gcc version 7.5.0 (Ubuntu
Jun 29 02:48:31 ubuntu kernel: Command line: BOOT_IMAGE=/boot/vmlinuz-5.3.0-1028-azure root=UUID=b0dd9d06-536e-41
Jun 29 02:48:31 ubuntu kernel: KERNEL supported cpus:
Jun 29 02:48:31 ubuntu kernel:   Intel GenuineIntel
...
在大多数情况下,我们建议以相反的顺序查看日志,首先查看最新的日志。
 ubuntu@ubuntu18:~$ sudo journalctl -r
-- Logs begin at Mon 2020-06-29 02:48:31 UTC, end at Wed 2020-08-19 15:10:16 UTC. --
Aug 19 15:10:16 ubuntu18 sudo[31263]: pam_unix(sudo:session): session opened for user root by ubuntu(uid=0)
Aug 19 15:10:16 ubuntu18 sudo[31263]:   ubuntu : TTY=pts/1 ; PWD=/home/ubuntu ; USER=root ; COMMAND=/bin/journalc
Aug 19 15:10:11 ubuntu18 sudo[31213]: pam_unix(sudo:session): session closed for user root
Aug 19 15:07:59 ubuntu18 sudo[31213]: pam_unix(sudo:session): session opened for user root by ubuntu(uid=0)
Aug 19 15:07:59 ubuntu18 sudo[31213]:   ubuntu : TTY=pts/1 ; PWD=/home/ubuntu ; USER=root ; COMMAND=/bin/journalc
Aug 19 15:07:56 ubuntu18 sudo[31183]: pam_unix(sudo:session): session closed for user root
Aug 19 15:06:47 ubuntu18 sudo[31183]: pam_unix(sudo:session): session opened for user root by ubuntu(uid=0)
...
例如,要查看特定服务的日志,请对 mysql 使用-u标志。
 ubuntu@ubuntu18:~$ sudo journalctl -u mysql
-- Logs begin at Mon 2020-06-29 02:48:31 UTC, end at Wed 2020-08-19 15:11:34 UTC. --
Aug 16 12:30:02 ubuntu18 systemd[1]: Starting MySQL Community Server...
Aug 16 12:30:03 ubuntu18 systemd[1]: Started MySQL Community Server.
Aug 19 15:03:27 ubuntu18 systemd[1]: Stopping MySQL Community Server...
Aug 19 15:03:29 ubuntu18 systemd[1]: Stopped MySQL Community Server.
杀,杀
有时您可能需要终止失控的进程或释放系统资源。使用-l标志杀死将显示可以发送到进程的所有信号。
 ubuntu@ubuntu18:~$ kill -l
 1) SIGHUP	 2) SIGINT	 3) SIGQUIT	 4) SIGILL	 5) SIGTRAP
 6) SIGABRT	 7) SIGBUS	 8) SIGFPE	 9) SIGKILL	10) SIGUSR1
11) SIGSEGV	12) SIGUSR2	13) SIGPIPE	14) SIGALRM	15) SIGTERM
16) SIGSTKFLT	17) SIGCHLD	18) SIGCONT	19) SIGSTOP	20) SIGTSTP
....
两个最常用的信号是 SIGTERM 和 SIGKILL。您还可以对 SIGKILL 使用 -9,对 SIGTERM 使用 -15。 SIGTERM 被称为软终止,因为它允许进程在退出之前完成。 SIGKILL 立即终止进程。例如:
列出所有 apache2 进程
ubuntu@ubuntu18:~$ ps aux|grep apache2
root      45521  0.0  0.5  78188  4688 ?        Ss   Aug08   0:03 /usr/sbin/apache2 -k start
www-data  45524  0.0  0.5 830480  4816 ?        Sl   Aug08   0:00 /usr/sbin/apache2 -k start
www-data  45525  0.0  0.7 830480  6856 ?        Sl   Aug08   0:00 /usr/sbin/apache2 -k start
ubuntu    70374  0.0  0.1  14852  1040 pts/0    S+   07:45   0:00 grep --color=auto apache2
要终止进程 ID 为 45525 的 apache2 进程:
ubuntu@ubuntu18:~$ sudo kill -9 45525再次查看Apache2进程列表。
 ubuntu@ubuntu18:~$ ps aux|grep apache2
root      45521  0.0  0.5  78188  4688 ?        Ss   Aug08   0:03 /usr/sbin/apache2 -k start
www-data  45524  0.0  0.5 830480  4816 ?        Sl   Aug08   0:00 /usr/sbin/apache2 -k start
ubuntu    70525  0.0  0.1  14852  1052 pts/0    S+   07:52   0:00 grep --color=auto apache2
要按名称终止程序,请使用killall。换句话说,killall 杀死控制(父)进程和所有子进程。要终止上例中 apache2 进程的所有实例:
ubuntu@ubuntu18:~$ sudo killall apache2谨慎使用kill和killall 。这些命令可能会使您的系统处于不稳定状态。
知识产权
在较新的 Linux 发行版中, ip命令被ifconfig取代。使用它来配置和查看网络接口。还用于查看和修改 IP 地址、路由和邻居对象。
显示所有网络接口的信息。
 ubuntu@ubuntu18:~$ ip a
1: lo: <LOOPBACK,UP,LOWER_UP> mtu 65536 qdisc noqueue state UNKNOWN group default qlen 1000
    link/loopback 00:00:00:00:00:00 brd 00:00:00:00:00:00
    inet 127.0.0.1/8 scope host lo
       valid_lft forever preferred_lft forever
    inet6 ::1/128 scope host
       valid_lft forever preferred_lft forever
2: eth0: <BROADCAST,MULTICAST,UP,LOWER_UP> mtu 1500 qdisc mq state UP group default qlen 1000
    link/ether 00:0d:3a:9b:88:d6 brd ff:ff:ff:ff:ff:ff
    inet 10.0.0.4/24 brd 10.0.0.255 scope global eth0
       valid_lft forever preferred_lft forever
    inet6 fe80::20d:3aff:fe9b:88d6/64 scope link
       valid_lft forever preferred_lft forever
要启动或停止接口,请使用 ip link set dev 后跟设备名称。例如,要使接口 eth0 联机:
ubuntu@ubuntu18:~$ ip link set eth0 up并将其降低:
ubuntu@ubuntu18:~$ ip link set eth0 down日期
这是一个非常常用的命令。以下是使用此命令的一些有趣的方法。
 ubuntu@ubuntu18:~$ date
Tue Aug 11 07:42:49 UTC 2020
要检查下周日的日期:
 ubuntu@ubuntu18:~$ date -d 'next sunday'
Sun Aug 16 00:00:00 UTC 2020
要检查上周日的日期:
 ubuntu@ubuntu18:~$ date -d 'last sunday'
Sun Aug  9 00:00:00 UTC 2020
您还可以使用 -date 代替 -d 标志。
 ubuntu@ubuntu18:~$ date --date='last sunday'
Sun Aug  9 00:00:00 UTC 2020
要查看 6 天前的日期:
 ubuntu@ubuntu18:~$ date --date='6 days ago'
Wed Aug  5 08:06:37 UTC 2020
6 天后的日期:
 ubuntu@ubuntu18:~$ date --date='6 days'
Mon Aug 17 08:08:37 UTC 2020
轻松控制日期输出格式。例如:
 ubuntu@ubuntu18:~$ date '+%d-%B-%Y'
11-August-2020
概括
作为系统管理员,您需要保持全球计算基础设施的运行。您需要解决问题并保持系统最佳运行,同时确保安全。
我希望这些命令有用并帮助您更好地完成工作。
在这里,我们为开发人员和系统管理员介绍一些 FTP/SFTP 客户端以及最好的 Vim 备忘单。


![2021 年如何设置 Raspberry Pi Web 服务器 [指南]](https://i0.wp.com/pcmanabu.com/wp-content/uploads/2019/10/web-server-02-309x198.png?w=1200&resize=1200,0&ssl=1)

