了解 Kubernetes 操作工具 Kops。
Kubernetes 因其令人惊叹的容器编排系统和功能而成为最受欢迎的 DevOps 工具之一。尽管 Kubernetes 提供了大量的功能,但从头开始设置 Kubernetes 集群可能会很痛苦。这就是警察发挥作用的地方。
借助 Kops,可以轻松在 AWS、Google Cloud 等云提供商上创建 Kubernetes 集群。这简化了 Kubernetes 集群的设置。本文将向您介绍这个神奇的工具。

什么是警察?
Kops也称为 Kubernetes Operations,是官方开源 Kubernetes 项目,允许您创建、维护、升级和销毁高可用的生产级 Kubernetes 集群。我们还根据您的要求提供云基础设施。 Kops 的开发人员将其称为 Kubernetes 集群的 kubectl。
Kops主要用于部署AWS和GCE Kubernetes集群。 Kops 仅正式支持 AWS,其他云提供商(例如 DigitalOcean、GCE 和 OpenStack)均处于测试阶段。
如果您以前使用过 kubectl,那么使用 Kops 会感觉很舒服。 Kops 提供创建、检索、更新和删除集群的命令。此外,Kops 使用声明性配置,因此它知道如何将更改应用到现有集群。 Kops 还允许您扩展和缩小 Kubernetes 集群。
Kops的特点如下。
- 部署高可用的 Kubernetes master
- 支持滚动集群更新
- 自动配置 AWS 和 GCE Kubernetes 集群
- 管理集群的附加组件
- 自动完成命令行上的命令
- 生成 CloudFormation 和 Terraform 配置
- 支持试运行和自动幂等性的状态同步模型
- 创建实例组以支持异构集群。

安装 Kops
以下是在 Linux 环境中安装 Kops 的简单步骤。我使用的是 Ubuntu 20.x。
首先,从发布包中下载 Kops。以下命令下载最新的 Kops 软件包。
 @ip-170-11-26-119:~$ curl -Lo kops https://github.com/kubernetes/kops/releases/download/$(curl -s https://api.github.com/repos/kubernetes/kops/releases/latest | grep tag_name | cut -d '"' -f 4)/kops-linux-amd64

Saving to: ‘kops-linux-amd64’
100%[=========================================================================================================================================================================>] 81,964,000  8.37MB/s   in 7.1s
2021-06-10 16:23:19 (7.84 MB/s) - ‘kops-linux-amd64’ saved [81964000/81964000]
您需要为下载的kops文件授予执行权限,并将其移至/usr/local/bin/目录。
 @ip-170-11-26-119:~$ sudo chmod +x kops-linux-amd64
@ip-170-11-26-119:~$ sudo mv kops-linux-amd64 /usr/local/bin/kops
安装完成。您现在可以运行 kops 命令来验证安装。
 @ip-170-11-26-119:~$ kops
kops is Kubernetes ops.
kops is the easiest way to get a production grade Kubernetes cluster up and running. We like to think of it as kubectl for clusters.

kops helps you create, destroy, upgrade and maintain production-grade, highly available, Kubernetes clusters from the command line. AWS (Amazon Web Services) is currently officially supported, with GCE and VMware vSphere in alpha support.

Usage:
kops [command]

Available Commands:
completion Output shell completion code for the given shell (bash or zsh).
create Create a resource by command line, filename or stdin.
delete Delete clusters,instancegroups, or secrets.
describe Describe a resource.
edit Edit clusters and other resources.
export Export configuration.
get Get one or many resources.
import Import a cluster.
replace Replace cluster resources.
rolling-update Rolling update a cluster.
toolbox Misc infrequently used commands.
update Update a cluster.
upgrade Upgrade a kubernetes cluster.
validate Validate a kops cluster.
version Print the kops version information.

Flags:
--alsologtostderr log to standard error as well as files
--config string config file (default is $HOME/.kops.yaml)
-h, --help help for kops
--log_backtrace_at traceLocation when logging hits line file:N, emit a stack trace (default :0)
--log_dir string If non-empty, write log files in this directory
--logtostderr log to standard error instead of files (default false)
--name string Name of cluster
--state string Location of state storage
--stderrthreshold severity logs at or above this threshold go to stderr (default 2)
-v, --v Level log level for V logs
--vmodule moduleSpec comma-separated list of pattern=N settings for file-filtered logging

Use "kops [command] --help" for more information about a command.
检查 Kops 版本以确保 Kops 安装正确。
 @ip-170-11-26-119:~$ kops version
Version 1.20.1 (git-5a27dad)
现在让我们看一下管理员广泛使用的一些重要的 Kops 命令来执行 Kubernetes 操作。
警察命令
以下是您应该了解的广泛使用的 Kops 命令。
警察创作
kops create 命令用于注册集群。
语法: kops create cluster <集群名称>
除了默认命令之外,您还可以添加许多其他参数,例如可用区、区域、实例类型、节点数等。
杯赛更新
kops update命令用于更新指定集群规格的集群。
语法: kops update cluster –name <集群名称>
在预览模式下运行此命令更安全。一旦预览输出符合预期,您就可以使用 -yes 标志运行命令,将更改应用到集群。
警察明白了
kops get 命令用于列出所有集群。
语法:获取 kops 集群
警察驱逐
kops delete 命令用于从注册表中删除特定集群以及分配给该集群的所有云资源。
语法: kops delete cluster –name <集群名称>
与更新类似,此命令也可以在预览模式下运行。
kops滚动更新
kops roll-update 命令用于更新 Kubernetes 集群以匹配云和 kops 规范。
语法: kops 滚动更新 cluster –name <集群名称>
与更新类似,此命令也可以在预览模式下运行。
警方将核实
kops validate 命令验证您创建的集群是否已启动。例如,如果 Pod 和节点处于挂起状态,则 validate 命令会返回集群尚未正常运行的信息。
语法: kops validate cluster –wait <指定时间>
此命令会等待并验证集群指定的时间。因此,如果您想验证集群 5 分钟,请以 5m 作为时间运行命令。
这就是 Kops 的基础知识。接下来,我们将向您展示如何使用 Kops 在 AWS 上创建 Kubernetes 集群。
使用 Kops 在 AWS 上设置 Kubernetes
在开始执行下述步骤之前,需要满足一些先决条件。
- 乌班图20.04
- AWS CLI
- AWS配置
安装 kubectl
首先,安装 kubectl。
Kubectl 用于在 Kubernetes 集群上运行命令行命令。下载 kubectl 包。
 @ip-170-11-26-119:~$  curl -LO https://storage.googleapis.com/kubernetes-release/release/$(curl -s https://storage.googleapis.com/kubernetes-release/release/stable.txt)/bin/linux/amd64/kubectl
  % Total    % Received % Xferd  Average Speed   Time    Time     Time  Current
                                 Dload  Upload   Total   Spent    Left  Speed
100 39.6M  100 39.6M    0     0  6988k      0  0:00:07  0:00:07 --:--:-- 6988k
您需要为下载的文件授予执行权限,并将其移至/usr/local/bin/目录。
 @ip-170-11-26-119:~$ chmod +x ./kubectl
@ip-170-11-26-119:~$ sudo mv ./kubectl /usr/local/bin/kubectl
创建 S3 存储桶
在 Linux 计算机上安装并配置 AWS CLI 后,您可以运行aws命令。现在我们已经在 Ubuntu 系统上安装了 aws cli,让我们运行一个简单的命令来列出 S3 中的所有存储桶。
@ip-170-11-26-119:~$ aws s3 ls此时s3桶还没有,所以会是空的。让我们检查 ec2 实例是否正在运行。
 @ip-170-11-26-119:~$ aws ec2 describe-instances
{
    "Reservations": []
}
这意味着此时没有 ec2 实例在运行。
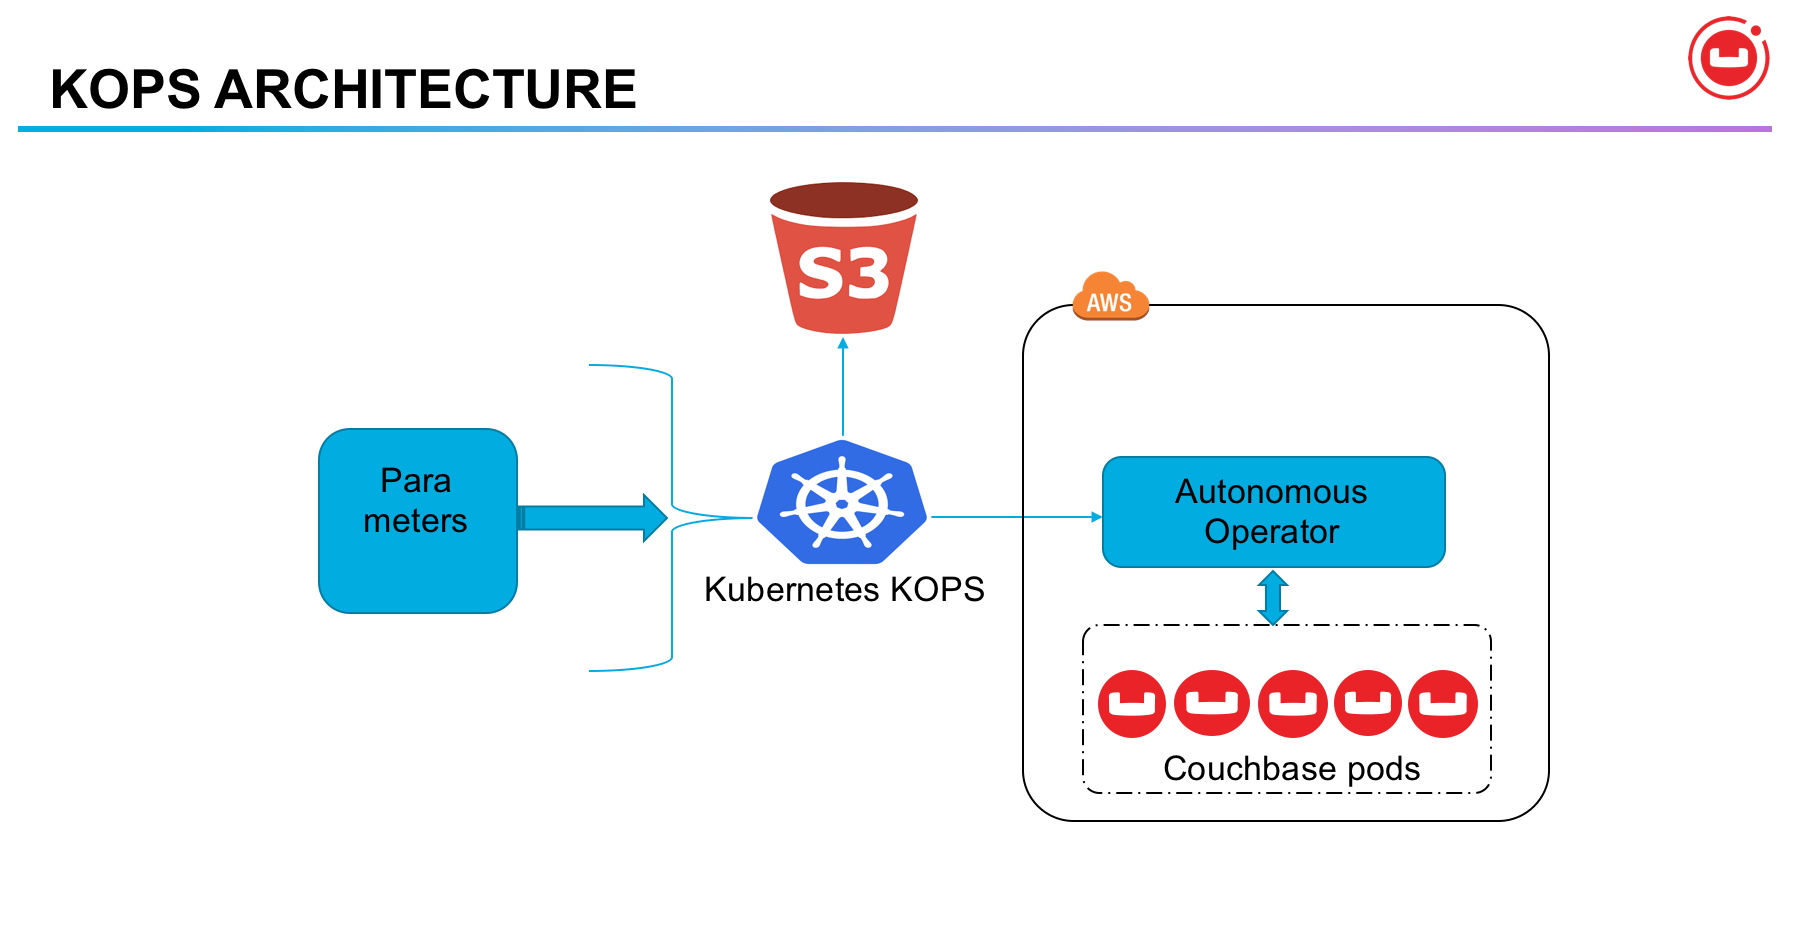
接下来,您需要创建一个 s3 存储桶,Kops 将在其中存储所有集群状态信息。我们正在 us-west-2 区域创建一个名为 geekkops-bucket-1132 的 s3 存储桶。您可以使用 LocationConstraint 来避免空间错误。
 @ip-170-11-26-119:~$ aws s3api create-bucket --bucket geekkops-bucket-1132 --region us-west-2 --create-bucket-configuration LocationConstraint=us-west-2
{
    "Location": "http://geekkops-bucket-1132.s3.amazonaws.com/"
}再次列出aws s3 bucket ,您将获得刚刚创建的存储桶。
 @ip-170-11-26-119:~$ aws s3 ls
2021-06-10 16:30:13 geekkops-bucket-1132
运行以下命令以启用 s3 存储桶的版本。
@ip-170-11-26-119:~$ aws s3api put-bucket-versioning --bucket geekkops-bucket-1132 --versioning-configuration Status=Enabled生成密钥
生成 Kops 用于生成集群登录名和密码的 ssh 密钥。
 @ip-170-11-26-119:~$ ssh-keygen
Generating public/private rsa key pair.
Enter file in which to save the key (/home/ubuntu/.ssh/id_rsa):
Enter passphrase (empty for no passphrase):
Enter same passphrase again:
Your identification has been saved in /home/ubuntu/.ssh/id_rsa.
Your public key has been saved in /home/ubuntu/.ssh/id_rsa.pub.
The key fingerprint is:
SHA256:fH4JCBXMNRqzk1hmoK+cXmwSFaeBsuGBA5IWMkNuvq0 @ip-170-11-26-119
The key's randomart image is:
+---[RSA 2048]----+
|O=. .++Xoo |
|B++ .. @o* . |
|.= =. = = |
|o o o o o |
| . . . S o |
| o. = o . . |
| . .= + . o |
| .. + . |
| E . |
+----[SHA256]-----+
导出环境变量
将您的集群名称和 s3 存储桶公开为环境变量。这仅适用于当前会话。我使用后缀“.k8s.local”,因为我没有使用预配置的 DNS。
 @ip-170-11-26-119:~$ export KOPS_CLUSTER_NAME=geekdemo1.k8s.local
@ip-170-11-26-119:~$ export KOPS_STATE_STORE=s3://geekkops-bucket-1132
创建集群
使用 kops create 命令创建集群。以下是我使用 Kops 在 AWS 上创建 Kubernetes 集群时使用的参数。
-
--cloud,通知您正在使用的云提供商 --zones是将部署集群实例的区域。-
--node-count,Kubernetes 集群中部署的节点数量。 -
--node-size和--master-sizeec2 实例类型。我正在使用一个微型实例。 -
--name是集群名称。
 @ip-170-11-26-119:~$ kops create cluster --cloud=aws --zones=eu-central-1a --node-count=1 --node-size=t2.micro --master-size=t2.micro --name=${KOPS_CLUSTER_NAME}
I0216 16:35:24.225238    4326 subnets.go:180] Assigned CIDR 172.20.32.0/19 to subnet eu-central-1a
I0216 16:35:24.068088    4326 create_cluster.go:717] Using SSH public key: /home/ubuntu/.ssh/id_rsa.pub
Previewing changes that will be made:

I0216 16:35:24.332590    4326 apply_cluster.go:465] Gossip DNS: skipping DNS validation
I0216 16:35:24.392712    4326 executor.go:111] Tasks: 0 done / 83 total; 42 can run
W0216 16:35:24.792113    4326 vfs_castore.go:604] CA private key was not found
I0216 16:35:24.938057    4326 executor.go:111] Tasks: 42 done / 83 total; 17 can run
I0216 16:35:25.436407    4326 executor.go:111] Tasks: 59 done / 83 total; 18 can run
I0216 16:35:25.822395    4326 executor.go:111] Tasks: 77 done / 83 total; 2 can run
I0216 16:35:25.823088    4326 executor.go:111] Tasks: 79 done / 83 total; 2 can run
I0216 16:35:26.406919    4326 executor.go:111] Tasks: 81 done / 83 total; 2 can run
I0216 16:35:27.842148    4326 executor.go:111] Tasks: 83 done / 83 total; 0 can run

  LaunchTemplate/master-eu-central-1a.masters.geekdemo1.k8s.local
        AssociatePublicIP       true
        HTTPPutResponseHopLimit 1
        HTTPTokens              optional
        IAMInstanceProfile      name:masters.geekdemo1.k8s.local id:masters.geekdemo1.k8s.local
        ImageID                 099720109477/ubuntu/images/hvm-ssd/ubuntu-focal-20.04-amd64-server-20210119.1
        InstanceType            t2.micro
        RootVolumeSize          64
        RootVolumeType          gp2
        RootVolumeEncryption    false
        RootVolumeKmsKey
        SSHKey                  name:kubernetes.geekdemo1.k8s.local-3e:19:92:ca:dd:64:d5:cf:ff:ed:3a:92:0f:40:d4:e8 id:kubernetes.geekdemo1.k8s.local-3e:19:92:ca:dd:64:d5:cf:ff:ed:3a:92:0f:40:d4:e8
        SecurityGroups          [name:masters.geekdemo1.k8s.local]
        SpotPrice
        Tags                    {k8s.io/cluster-autoscaler/node-template/label/kubernetes.io/role: master, k8s.io/cluster-autoscaler/node-template/label/kops.k8s.io/instancegroup: master-eu-central-1a, k8s.io/role/master: 1, kops.k8s.io/instancegroup: master-eu-central-1a, Name: master-eu-central-1a.masters.geekdemo1.k8s.local, KubernetesCluster: geekdemo1.k8s.local, kubernetes.io/cluster/geekdemo1.k8s.local: owned, k8s.io/cluster-autoscaler/node-template/label/node-role.kubernetes.io/master: }

  Subnet/eu-central-1a.geekdemo1.k8s.local
        ShortName               eu-central-1a
        VPC                     name:geekdemo1.k8s.local
        AvailabilityZone        eu-central-1a
        CIDR                    172.20.32.0/19
        Shared                  false
        Tags                    {KubernetesCluster: geekdemo1.k8s.local, kubernetes.io/cluster/geekdemo1.k8s.local: owned, SubnetType: Public, kubernetes.io/role/elb: 1, Name: eu-central-1a.geekdemo1.k8s.local}

  VPC/geekdemo1.k8s.local
        CIDR                    172.20.0.0/16
        EnableDNSHostnames      true
        EnableDNSSupport        true
        Shared                  false
        Tags                    {kubernetes.io/cluster/geekdemo1.k8s.local: owned, Name: geekdemo1.k8s.local, KubernetesCluster: geekdemo1.k8s.local}

  VPCDHCPOptionsAssociation/geekdemo1.k8s.local
        VPC                     name:geekdemo1.k8s.local
        DHCPOptions             name:geekdemo1.k8s.local

Must specify --yes to apply changes

Cluster configuration has been created.

Suggestions:
 * list clusters with: kops get cluster
 * edit this cluster with: kops edit cluster geekdemo1.k8s.local
 * edit your node instance group: kops edit ig --name=geekdemo1.k8s.local nodes-eu-central-1a
 * edit your master instance group: kops edit ig --name=geekdemo1.k8s.local master-eu-central-1a

Finally configure your cluster with: kops update cluster --name geekdemo1.k8s.local --yes –admin
执行kops get命令查看集群是否创建。
 @ip-170-11-26-119:~$ kops get cluster
NAME                    CLOUD   ZONES
geekdemo1.k8s.local     aws     eu-central-1a
更新集群
运行 kops update 命令将指定的集群规范应用到您的集群。
 @ip-170-11-26-119:~$ kops update cluster --name geekdemo1.k8s.local --yes --admin
I0216 16:38:16.800767    4344 apply_cluster.go:465] Gossip DNS: skipping DNS validation
I0216 16:38:16.919282    4344 executor.go:111] Tasks: 0 done / 83 total; 42 can run
W0216 16:38:17.343336    4344 vfs_castore.go:604] CA private key was not found
I0216 16:38:18.421652    4344 keypair.go:195] Issuing new certificate: "etcd-clients-ca"
I0216 16:38:18.450699    4344 keypair.go:195] Issuing new certificate: "etcd-peers-ca-main"
I0216 16:38:19.470785    4344 keypair.go:195] Issuing new certificate: "etcd-manager-ca-main"
I0216 16:38:19.531852    4344 keypair.go:195] Issuing new certificate: "etcd-peers-ca-events"
I0216 16:38:19.551601    4344 keypair.go:195] Issuing new certificate: "apiserver-aggregator-ca"
I0216 16:38:19.571834    4344 keypair.go:195] Issuing new certificate: "etcd-manager-ca-events"
I0216 16:38:19.592090    4344 keypair.go:195] Issuing new certificate: "master"
W0216 16:38:19.652894    4344 vfs_castore.go:604] CA private key was not found
I0216 16:38:19.653013    4344 keypair.go:195] Issuing new certificate: "ca"
I0216 16:38:24.344075    4344 executor.go:111] Tasks: 42 done / 83 total; 17 can run
I0216 16:38:24.306125    4344 executor.go:111] Tasks: 59 done / 83 total; 18 can run
I0216 16:38:26.189798    4344 executor.go:111] Tasks: 77 done / 83 total; 2 can run
I0216 16:38:26.190464    4344 executor.go:111] Tasks: 79 done / 83 total; 2 can run
I0216 16:38:26.738600    4344 executor.go:111] Tasks: 81 done / 83 total; 2 can run
I0216 16:38:28.810100    4344 executor.go:111] Tasks: 83 done / 83 total; 0 can run
I0216 16:38:29.904257    4344 update_cluster.go:313] Exporting kubecfg for cluster
kops has set your kubectl context to geekdemo1.k8s.local

Cluster is starting.  It should be ready in a few minutes.

Suggestions:
 * validate cluster: kops validate cluster --wait 10m
 * list nodes: kubectl get nodes --show-labels
 * ssh to the master: ssh -i ~/.ssh/id_rsa ubuntu@api.geekdemo1.k8s.local
 * the ubuntu user is specific to Ubuntu. If not using Ubuntu please use the appropriate user based on your OS.
 * read about installing addons at: https://kops.sigs.k8s.io/operations/addons.
立即检查 Kubernetes 节点是否正在运行会导致错误。您需要有一点耐心,等待几分钟(5-10 分钟)才能创建集群。
 @ip-170-11-26-119:~$ kubectl get nodes
Unable to connect to the server: dial tcp: lookup api-geekdemo1-k8s-local-dason2-1001342368.eu-central-1.elb.amazonaws.com on 127.0.0.53:53: no such host
验证集群
验证命令运行 5 分钟以检查集群是否正常运行。在验证输出中,您可以看到正在运行的节点的详细信息。
 @ip-170-11-26-119:~$ kops validate cluster --wait 5m
Validating cluster geekdemo1.k8s.local
INSTANCE GROUPS
NAME                    ROLE    MACHINETYPE     MIN     MAX     SUBNETS
master-eu-central-1a    Master  t2.micro        1       1       eu-central-1a
nodes-eu-central-1a     Node    t2.micro        1       1       eu-central-1a
列出节点和 Pod
接下来,运行以下命令检查所有节点是否已准备就绪并正在运行。可以看到master和node都处于ready状态。
 @ip-170-11-26-119:~$ kubectl get nodes
NAME                                             STATUS   ROLES    AGE     VERSION
ip-173-19-35-156.eu-central-1.compute.internal   Ready    master   10m     v1.20.1
ip-172-36-23-149.eu-central-1.compute.internal   Ready    node     5m38s   v1.20.1
您可以看到 Kubernetes 集群中运行的所有 Pod。
 @ip-170-11-26-119:~$ kubectl get pods --all-namespaces
NAMESPACE     NAME                                                                     READY   STATUS    RESTARTS   AGE
kube-system   dns-controller-8d8889c4b-xp9dl                                           1/1     Running   0          8m26s
kube-system   etcd-manager-events-ip-173-19-35-156.eu-central-1.compute.internal       1/1     Running   0          10m
kube-system   etcd-manager-main-ip-173-19-35-156.eu-central-1.compute.internal         1/1     Running   0          10m
kube-system   kops-controller-9skdk                                                    1/1     Running   3          6m51s
kube-system   kube-apiserver-ip-173-19-35-156.eu-central-1.compute.internal            2/2     Running   0          10m
kube-system   kube-controller-manager-ip-173-19-35-156.eu-central-1.compute.internal   1/1     Running   6          10m
kube-system   kube-dns-696cb84c7-g8nhb                                                 3/3     Running   0          4m27s
kube-system   kube-dns-autoscaler-55f8f75459-zlxbr                                     1/1     Running   0          7m18s
kube-system   kube-proxy-ip-173-19-35-156.eu-central-1.compute.internal                1/1     Running   0          10m
kube-system   kube-proxy-ip-172-36-23-149.eu-central-1.compute.internal                1/1     Running   0          7m2s
kube-system   kube-scheduler-ip-173-19-35-156.eu-central-1.compute.internal            1/1     Running   5          10m
删除集群
与创建 Kubernetes 集群类似,使用 Kops 删除 Kubernetes 集群非常容易。此 kops delete 命令将删除集群的所有云资源以及集群注册表本身。
 @ip-170-11-26-119:~$ kops delete cluster --name geekdemo1.k8s.local --yes
TYPE                    NAME                                                                            ID
autoscaling-config      master-eu-central-1a.masters.geekdemo1.k8s.local                                lt-0cc11aec1943204e4
autoscaling-config      nodes-eu-central-1a.geekdemo1.k8s.local                                         lt-0da65d2eaf6de9f5c
autoscaling-group       master-eu-central-1a.masters.geekdemo1.k8s.local                                master-eu-central-1a.masters.geekdemo1.k8s.local
autoscaling-group       nodes-eu-central-1a.geekdemo1.k8s.local                                         nodes-eu-central-1a.geekdemo1.k8s.local
dhcp-options            geekdemo1.k8s.local                                                             dopt-0403a0cbbfbc0c72b
iam-instance-profile    masters.geekdemo1.k8s.local                                                     masters.geekdemo1.k8s.local
iam-instance-profile    nodes.geekdemo1.k8s.local                                                       nodes.geekdemo1.k8s.local
iam-role                masters.geekdemo1.k8s.local                                                     masters.geekdemo1.k8s.local
iam-role                nodes.geekdemo1.k8s.local                                                       nodes.geekdemo1.k8s.local
instance                master-eu-central-1a.masters.geekdemo1.k8s.local                                i-069c73f2c23eb502a
instance                nodes-eu-central-1a.geekdemo1.k8s.local                                         i-0401d6b0d4fc11e77
iam-instance-profile:nodes.geekdemo1.k8s.local  ok
load-balancer:api-geekdemo1-k8s-local-dason2    ok
iam-instance-profile:masters.geekdemo1.k8s.local        ok
iam-role:masters.geekdemo1.k8s.local    ok
instance:i-069c73f2c23eb502a    ok
autoscaling-group:nodes-eu-central-1a.geekdemo1.k8s.local       ok
iam-role:nodes.geekdemo1.k8s.local      ok
instance:i-0401d6b0d4fc11e77    ok
autoscaling-config:lt-0cc11aec1943204e4 ok
autoscaling-config:lt-0da65d2eaf6de9f5c ok
autoscaling-group:master-eu-central-1a.masters.geekdemo1.k8s.local      ok
keypair:key-0d82g920j421b89dn   ok
Deleted kubectl config for geekdemo1.k8s.local

Deleted cluster: "geekdemo1.k8s.local"
结论
我希望您觉得这篇关于 Kops 的文章很有用,并且您今天学到了一些新东西。 Kops 是在云上使用 Kubernetes 的绝佳工具。因此,请尝试执行本文中描述的步骤,使用 Kops 在 AWS 上设置 Kubernetes 集群。


![2021 年如何设置 Raspberry Pi Web 服务器 [指南]](https://i0.wp.com/pcmanabu.com/wp-content/uploads/2019/10/web-server-02-309x198.png?w=1200&resize=1200,0&ssl=1)

