
Kubernetes 運用ツールである Kops について学びましょう。
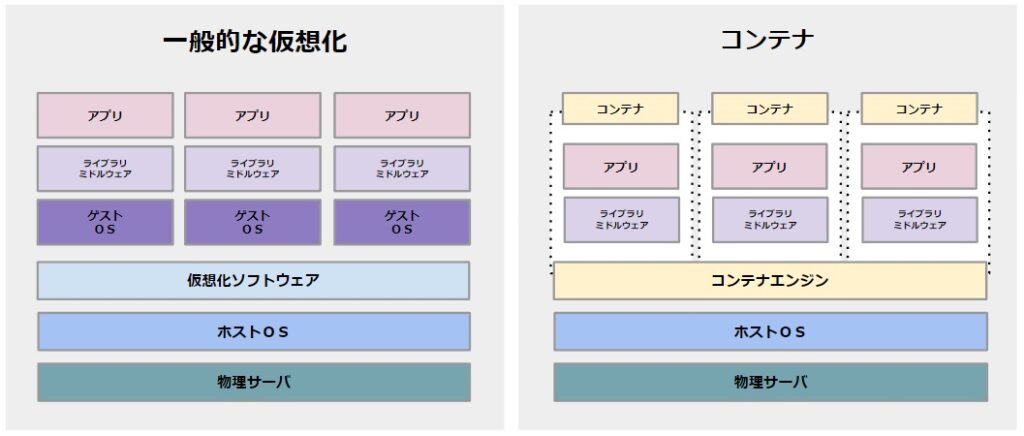
Kubernetes は、その驚くべきコンテナ オーケストレーション システムと機能により、最も人気のある DevOps ツールの 1 つです。しかし、Kubernetes は非常に多くの機能を提供しますが、Kubernetes クラスターを最初からセットアップするのは骨が折れます。ここでコップスが登場します。
Kops を使用すると、AWS、Google Cloud などのクラウド プロバイダー上に Kubernetes クラスターを作成するのは簡単です。これにより、Kubernetes クラスターのセットアップが簡単になります。この記事では、この素晴らしいツールについて説明します。

コップスとは何ですか?
Kubernetes オペレーションとも呼ばれる Kops は 、オープンソースの公式 Kubernetes プロジェクトであり、これを使用すると、可用性の高い運用グレードの Kubernetes クラスターを作成、保守、アップグレード、破棄できます。要件に応じてクラウド インフラストラクチャもプロビジョニングします。 Kops の開発者は、Kops を Kubernetes クラスターの kubectl と呼んでいます。
Kops は主に、AWS および GCE Kubernetes クラスターのデプロイに使用されます。 Kops は AWS のみを正式にサポートしており、DigitalOcean、GCE、OpenStack などの他のクラウド プロバイダーはベータ段階にあります。
以前に kubectl に取り組んだことがあれば、Kops に快適に取り組むことができるでしょう。 Kops は、クラスターを作成、取得、更新、削除するためのコマンドを提供します。さらに、Kops は宣言型構成を使用するため、既存のクラスターに変更を適用する方法を知っています。 Kops を使用すると、Kubernetes クラスターをスケールアップおよびスケールダウンすることもできます。
Kopsの特徴は以下の通りです。
- 高可用性を備えた Kubernetes マスターをデプロイします
- ローリングクラスターアップデートがサポートされています
- AWS および GCE Kubernetes クラスターのプロビジョニングを自動化します
- クラスターのアドオンを管理します
- コマンドラインでのコマンドのオートコンプリート
- CloudFormation および Terraform 構成を生成します
- ドライランと自動冪等性のための状態同期モデルをサポート
- 異種クラスターをサポートするインスタンス グループを作成します。

Kopsのインストール
以下は、Linux 環境に Kops をインストールする簡単な手順です。 Ubuntu 20.xを使用しています。
まず、リリース パッケージから Kops をダウンロードします。以下のコマンドは、Kops の最新パッケージをダウンロードします。
 @ip-170-11-26-119:~$ curl -Lo kops https://github.com/kubernetes/kops/releases/download/$(curl -s https://api.github.com/repos/kubernetes/kops/releases/latest | grep tag_name | cut -d '"' -f 4)/kops-linux-amd64

Saving to: ‘kops-linux-amd64’
100%[=========================================================================================================================================================================>] 81,964,000  8.37MB/s   in 7.1s
2021-06-10 16:23:19 (7.84 MB/s) - ‘kops-linux-amd64’ saved [81964000/81964000]
ダウンロードした kops ファイルに実行権限を付与し、/usr/local/bin/ ディレクトリに移動する必要があります。
 @ip-170-11-26-119:~$ sudo chmod +x kops-linux-amd64
@ip-170-11-26-119:~$ sudo mv kops-linux-amd64 /usr/local/bin/kops
インストールが完了しました。これで、kops コマンドを実行してインストールを確認できるようになります。
 @ip-170-11-26-119:~$ kops
kops is Kubernetes ops.
kops is the easiest way to get a production grade Kubernetes cluster up and running. We like to think of it as kubectl for clusters.

kops helps you create, destroy, upgrade and maintain production-grade, highly available, Kubernetes clusters from the command line. AWS (Amazon Web Services) is currently officially supported, with GCE and VMware vSphere in alpha support.

Usage:
kops [command]

Available Commands:
completion Output shell completion code for the given shell (bash or zsh).
create Create a resource by command line, filename or stdin.
delete Delete clusters,instancegroups, or secrets.
describe Describe a resource.
edit Edit clusters and other resources.
export Export configuration.
get Get one or many resources.
import Import a cluster.
replace Replace cluster resources.
rolling-update Rolling update a cluster.
toolbox Misc infrequently used commands.
update Update a cluster.
upgrade Upgrade a kubernetes cluster.
validate Validate a kops cluster.
version Print the kops version information.

Flags:
--alsologtostderr log to standard error as well as files
--config string config file (default is $HOME/.kops.yaml)
-h, --help help for kops
--log_backtrace_at traceLocation when logging hits line file:N, emit a stack trace (default :0)
--log_dir string If non-empty, write log files in this directory
--logtostderr log to standard error instead of files (default false)
--name string Name of cluster
--state string Location of state storage
--stderrthreshold severity logs at or above this threshold go to stderr (default 2)
-v, --v Level log level for V logs
--vmodule moduleSpec comma-separated list of pattern=N settings for file-filtered logging

Use "kops [command] --help" for more information about a command.
Kops のバージョンをチェックして、Kops が正しくインストールされていることを確認します。
 @ip-170-11-26-119:~$ kops version
Version 1.20.1 (git-5a27dad)
ここで、Kubernetes 操作を実行するために管理者によって広く使用されているいくつかの重要な Kops コマンドを見てみましょう。
警官コマンド
以下は、広く使用されている知っておくべき Kops コマンドです。
コップス作成
kops create コマンドはクラスターの登録に使用されます。
構文: kops create cluster <クラスター名>
デフォルトのコマンドに加えて、ゾーン、リージョン、インスタンス タイプ、ノード数など、他にも多くのパラメータを追加できます。
コップのアップデート
kops update コマンドは、指定されたクラスター仕様でクラスターを更新するために使用されます。
構文: kops update クラスター –name <クラスター名>
このコマンドをプレビュー モードで実行すると、より安全になります。プレビュー出力が期待どおりになったら、-yes フラグを指定してコマンドを実行して変更をクラスターに適用できます。
警官が手に入れます
kops get コマンドは、すべてのクラスターを一覧表示するために使用されます。
構文: kops クラスターを取得
警察の削除
kops delete コマンドは、レジストリから特定のクラスターとそのクラスターに割り当てられているすべてのクラウド リソースを削除するために使用されます。
構文: kops delete クラスター –name <クラスター名>
更新と同様に、このコマンドはプレビュー モードでも実行できます。
kops ローリングアップデート
kops rolling-update コマンドは、クラウドと kops の仕様に一致するように Kubernetes クラスターを更新するために使用されます。
構文: kops ローリングアップデート クラスター –name <クラスター名>
更新と同様に、このコマンドはプレビュー モードでも実行できます。
警察が検証する
kops validate コマンドは、作成したクラスターが起動しているかどうかを検証します。たとえば、ポッドとノードが保留状態にある場合、validate コマンドはクラスターがまだ正常ではないことを返します。
構文: kops validate cluster –wait <指定された時間>
このコマンドは、指定された時間クラスターを待機して検証します。したがって、クラスターを 5 分間検証する場合は、時間として 5m を指定してコマンドを実行します。
Kops の基礎については以上でした。次に、Kops を使用して AWS 上に Kubernetes クラスターを作成する方法を説明します。
Kops を使用して AWS で Kubernetes をセットアップする
以下で説明する手順を開始する前に、いくつかの前提条件があります。
- Ubuntu 20.04
- AWS CLI
- AWS の設定
kubectlのインストール
まずはkubectlをインストールします。
Kubectl は、Kubernetes クラスター上でコマンド ライン コマンドを実行するために使用されます。 kubectl パッケージをダウンロードします。
 @ip-170-11-26-119:~$  curl -LO https://storage.googleapis.com/kubernetes-release/release/$(curl -s https://storage.googleapis.com/kubernetes-release/release/stable.txt)/bin/linux/amd64/kubectl
  % Total    % Received % Xferd  Average Speed   Time    Time     Time  Current
                                 Dload  Upload   Total   Spent    Left  Speed
100 39.6M  100 39.6M    0     0  6988k      0  0:00:07  0:00:07 --:--:-- 6988k
ダウンロードしたファイルに実行権限を付与し、/usr/local/bin/ ディレクトリに移動する必要があります。
 @ip-170-11-26-119:~$ chmod +x ./kubectl
@ip-170-11-26-119:~$ sudo mv ./kubectl /usr/local/bin/kubectl
S3バケットの作成
Linux マシンに AWS CLI をインストールして設定すると、
aws
コマンドを実行できるようになります。 Ubuntu システムに aws cli がインストールされているので、S3 内のすべてのバケットを一覧表示する簡単なコマンドを実行してみましょう。
@ip-170-11-26-119:~$ aws s3 ls
現時点では s3 バケットがないため、空になります。 ec2 インスタンスが実行されているかどうかを確認してみましょう。
 @ip-170-11-26-119:~$ aws ec2 describe-instances
{
    "Reservations": []
}
これは、現時点では ec2 インスタンスが実行されていないことを意味します。
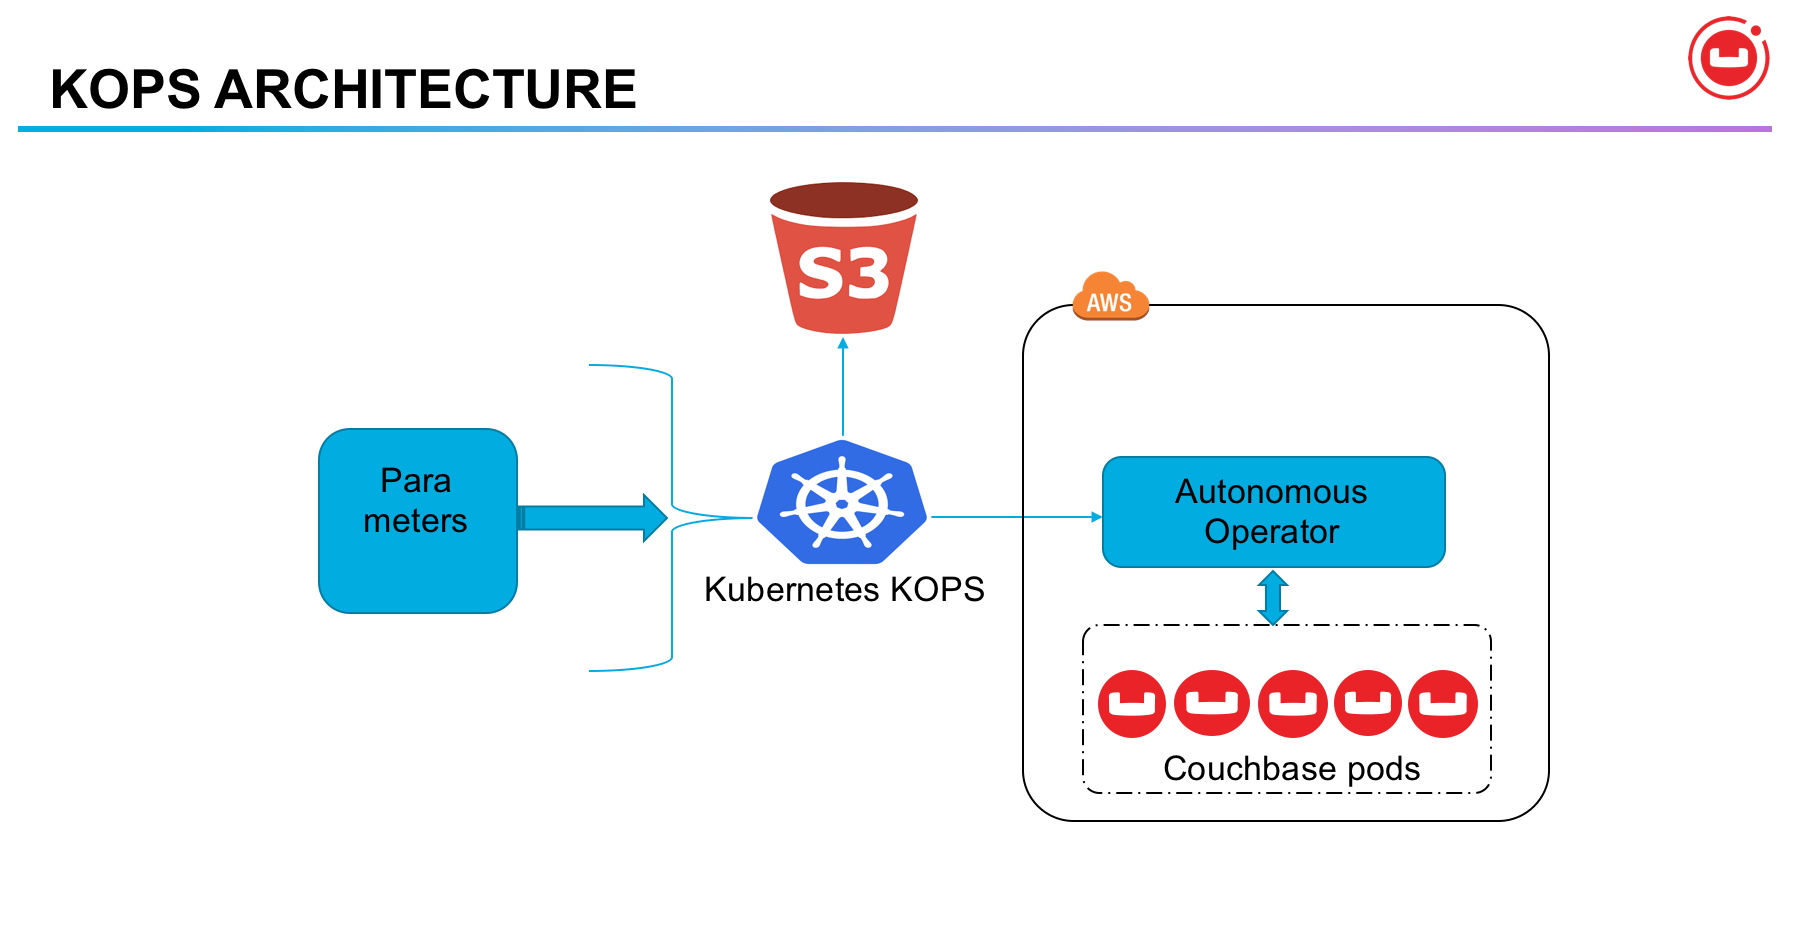
次に、Kops がすべてのクラスターの状態情報を保存する s3 バケットを作成する必要があります。ここでは、us-west-2 リージョンに geekkops-bucket-1132 という名前の s3 バケットを作成しています。 LocationConstraint を使用すると、領域に関するエラーを回避できます。
 @ip-170-11-26-119:~$ aws s3api create-bucket --bucket geekkops-bucket-1132 --region us-west-2 --create-bucket-configuration LocationConstraint=us-west-2
{
    "Location": "http://geekkops-bucket-1132.s3.amazonaws.com/"
}
aws s3 bucket
再度リストすると、作成したばかりのバケットが取得されます。
 @ip-170-11-26-119:~$ aws s3 ls
2021-06-10 16:30:13 geekkops-bucket-1132
以下のコマンドを実行して、s3 バケットのバージョンを有効にします。
@ip-170-11-26-119:~$ aws s3api put-bucket-versioning --bucket geekkops-bucket-1132 --versioning-configuration Status=Enabled
キーの生成
Kops がクラスターのログインとパスワードの生成に使用する ssh キーを生成します。
 @ip-170-11-26-119:~$ ssh-keygen
Generating public/private rsa key pair.
Enter file in which to save the key (/home/ubuntu/.ssh/id_rsa):
Enter passphrase (empty for no passphrase):
Enter same passphrase again:
Your identification has been saved in /home/ubuntu/.ssh/id_rsa.
Your public key has been saved in /home/ubuntu/.ssh/id_rsa.pub.
The key fingerprint is:
SHA256:fH4JCBXMNRqzk1hmoK+cXmwSFaeBsuGBA5IWMkNuvq0 @ip-170-11-26-119
The key's randomart image is:
+---[RSA 2048]----+
|O=. .++Xoo |
|B++ .. @o* . |
|.= =. = = |
|o o o o o |
| . . . S o |
| o. = o . . |
| . .= + . o |
| .. + . |
| E . |
+----[SHA256]-----+
環境変数のエクスポート
クラスター名と s3 バケットを環境変数として公開します。これは現在のセッションにのみ適用されます。事前構成された DNS を使用していないため、サフィックス「.k8s.local」を使用しています。
 @ip-170-11-26-119:~$ export KOPS_CLUSTER_NAME=geekdemo1.k8s.local
@ip-170-11-26-119:~$ export KOPS_STATE_STORE=s3://geekkops-bucket-1132
クラスターを作成する
kops create コマンドを使用してクラスターを作成します。以下は、Kops を使用して AWS 上に Kubernetes クラスターを作成するために使用しているパラメーターです。
-
--cloud、使用しているクラウドプロバイダーに通知します -
--zonesは、クラスター インスタンスがデプロイされるゾーンです。 -
--node-count、Kubernetes クラスターにデプロイするノードの数です。 -
--node-sizeと--master-sizeec2 インスタンス タイプです。マイクロ インスタンスを使用しています。 -
--nameはクラスター名です。
 @ip-170-11-26-119:~$ kops create cluster --cloud=aws --zones=eu-central-1a --node-count=1 --node-size=t2.micro --master-size=t2.micro --name=${KOPS_CLUSTER_NAME}
I0216 16:35:24.225238    4326 subnets.go:180] Assigned CIDR 172.20.32.0/19 to subnet eu-central-1a
I0216 16:35:24.068088    4326 create_cluster.go:717] Using SSH public key: /home/ubuntu/.ssh/id_rsa.pub
Previewing changes that will be made:

I0216 16:35:24.332590    4326 apply_cluster.go:465] Gossip DNS: skipping DNS validation
I0216 16:35:24.392712    4326 executor.go:111] Tasks: 0 done / 83 total; 42 can run
W0216 16:35:24.792113    4326 vfs_castore.go:604] CA private key was not found
I0216 16:35:24.938057    4326 executor.go:111] Tasks: 42 done / 83 total; 17 can run
I0216 16:35:25.436407    4326 executor.go:111] Tasks: 59 done / 83 total; 18 can run
I0216 16:35:25.822395    4326 executor.go:111] Tasks: 77 done / 83 total; 2 can run
I0216 16:35:25.823088    4326 executor.go:111] Tasks: 79 done / 83 total; 2 can run
I0216 16:35:26.406919    4326 executor.go:111] Tasks: 81 done / 83 total; 2 can run
I0216 16:35:27.842148    4326 executor.go:111] Tasks: 83 done / 83 total; 0 can run

  LaunchTemplate/master-eu-central-1a.masters.geekdemo1.k8s.local
        AssociatePublicIP       true
        HTTPPutResponseHopLimit 1
        HTTPTokens              optional
        IAMInstanceProfile      name:masters.geekdemo1.k8s.local id:masters.geekdemo1.k8s.local
        ImageID                 099720109477/ubuntu/images/hvm-ssd/ubuntu-focal-20.04-amd64-server-20210119.1
        InstanceType            t2.micro
        RootVolumeSize          64
        RootVolumeType          gp2
        RootVolumeEncryption    false
        RootVolumeKmsKey
        SSHKey                  name:kubernetes.geekdemo1.k8s.local-3e:19:92:ca:dd:64:d5:cf:ff:ed:3a:92:0f:40:d4:e8 id:kubernetes.geekdemo1.k8s.local-3e:19:92:ca:dd:64:d5:cf:ff:ed:3a:92:0f:40:d4:e8
        SecurityGroups          [name:masters.geekdemo1.k8s.local]
        SpotPrice
        Tags                    {k8s.io/cluster-autoscaler/node-template/label/kubernetes.io/role: master, k8s.io/cluster-autoscaler/node-template/label/kops.k8s.io/instancegroup: master-eu-central-1a, k8s.io/role/master: 1, kops.k8s.io/instancegroup: master-eu-central-1a, Name: master-eu-central-1a.masters.geekdemo1.k8s.local, KubernetesCluster: geekdemo1.k8s.local, kubernetes.io/cluster/geekdemo1.k8s.local: owned, k8s.io/cluster-autoscaler/node-template/label/node-role.kubernetes.io/master: }

  Subnet/eu-central-1a.geekdemo1.k8s.local
        ShortName               eu-central-1a
        VPC                     name:geekdemo1.k8s.local
        AvailabilityZone        eu-central-1a
        CIDR                    172.20.32.0/19
        Shared                  false
        Tags                    {KubernetesCluster: geekdemo1.k8s.local, kubernetes.io/cluster/geekdemo1.k8s.local: owned, SubnetType: Public, kubernetes.io/role/elb: 1, Name: eu-central-1a.geekdemo1.k8s.local}

  VPC/geekdemo1.k8s.local
        CIDR                    172.20.0.0/16
        EnableDNSHostnames      true
        EnableDNSSupport        true
        Shared                  false
        Tags                    {kubernetes.io/cluster/geekdemo1.k8s.local: owned, Name: geekdemo1.k8s.local, KubernetesCluster: geekdemo1.k8s.local}

  VPCDHCPOptionsAssociation/geekdemo1.k8s.local
        VPC                     name:geekdemo1.k8s.local
        DHCPOptions             name:geekdemo1.k8s.local

Must specify --yes to apply changes

Cluster configuration has been created.

Suggestions:
 * list clusters with: kops get cluster
 * edit this cluster with: kops edit cluster geekdemo1.k8s.local
 * edit your node instance group: kops edit ig --name=geekdemo1.k8s.local nodes-eu-central-1a
 * edit your master instance group: kops edit ig --name=geekdemo1.k8s.local master-eu-central-1a

Finally configure your cluster with: kops update cluster --name geekdemo1.k8s.local --yes –admin
kops get コマンドを実行して、クラスターが作成されたかどうかを確認します。
 @ip-170-11-26-119:~$ kops get cluster
NAME                    CLOUD   ZONES
geekdemo1.k8s.local     aws     eu-central-1a
クラスターを更新する
指定したクラスター仕様をクラスターに適用するには、kops update コマンドを実行します。
 @ip-170-11-26-119:~$ kops update cluster --name geekdemo1.k8s.local --yes --admin
I0216 16:38:16.800767    4344 apply_cluster.go:465] Gossip DNS: skipping DNS validation
I0216 16:38:16.919282    4344 executor.go:111] Tasks: 0 done / 83 total; 42 can run
W0216 16:38:17.343336    4344 vfs_castore.go:604] CA private key was not found
I0216 16:38:18.421652    4344 keypair.go:195] Issuing new certificate: "etcd-clients-ca"
I0216 16:38:18.450699    4344 keypair.go:195] Issuing new certificate: "etcd-peers-ca-main"
I0216 16:38:19.470785    4344 keypair.go:195] Issuing new certificate: "etcd-manager-ca-main"
I0216 16:38:19.531852    4344 keypair.go:195] Issuing new certificate: "etcd-peers-ca-events"
I0216 16:38:19.551601    4344 keypair.go:195] Issuing new certificate: "apiserver-aggregator-ca"
I0216 16:38:19.571834    4344 keypair.go:195] Issuing new certificate: "etcd-manager-ca-events"
I0216 16:38:19.592090    4344 keypair.go:195] Issuing new certificate: "master"
W0216 16:38:19.652894    4344 vfs_castore.go:604] CA private key was not found
I0216 16:38:19.653013    4344 keypair.go:195] Issuing new certificate: "ca"
I0216 16:38:24.344075    4344 executor.go:111] Tasks: 42 done / 83 total; 17 can run
I0216 16:38:24.306125    4344 executor.go:111] Tasks: 59 done / 83 total; 18 can run
I0216 16:38:26.189798    4344 executor.go:111] Tasks: 77 done / 83 total; 2 can run
I0216 16:38:26.190464    4344 executor.go:111] Tasks: 79 done / 83 total; 2 can run
I0216 16:38:26.738600    4344 executor.go:111] Tasks: 81 done / 83 total; 2 can run
I0216 16:38:28.810100    4344 executor.go:111] Tasks: 83 done / 83 total; 0 can run
I0216 16:38:29.904257    4344 update_cluster.go:313] Exporting kubecfg for cluster
kops has set your kubectl context to geekdemo1.k8s.local

Cluster is starting.  It should be ready in a few minutes.

Suggestions:
 * validate cluster: kops validate cluster --wait 10m
 * list nodes: kubectl get nodes --show-labels
 * ssh to the master: ssh -i ~/.ssh/id_rsa ubuntu@api.geekdemo1.k8s.local
 * the ubuntu user is specific to Ubuntu. If not using Ubuntu please use the appropriate user based on your OS.
 * read about installing addons at: https://kops.sigs.k8s.io/operations/addons.
Kubernetes ノードが実行されているかどうかをすぐに確認すると、エラーが発生します。クラスターが作成されるまで、少し辛抱して数分 (5 ~ 10 分) 待つ必要があります。
 @ip-170-11-26-119:~$ kubectl get nodes
Unable to connect to the server: dial tcp: lookup api-geekdemo1-k8s-local-dason2-1001342368.eu-central-1.elb.amazonaws.com on 127.0.0.53:53: no such host
クラスターを検証する
validate コマンドを 5 分間実行して、クラスターが稼働していて正常かどうかを確認しています。検証出力では、稼働中のノードの詳細を確認できます。
 @ip-170-11-26-119:~$ kops validate cluster --wait 5m
Validating cluster geekdemo1.k8s.local
INSTANCE GROUPS
NAME                    ROLE    MACHINETYPE     MIN     MAX     SUBNETS
master-eu-central-1a    Master  t2.micro        1       1       eu-central-1a
nodes-eu-central-1a     Node    t2.micro        1       1       eu-central-1a
ノードとポッドをリストする
次に、以下のコマンドを実行して、すべてのノードが準備ができて実行されているかどうかを確認します。マスターとノードの両方が準備完了ステータスであることがわかります。
 @ip-170-11-26-119:~$ kubectl get nodes
NAME                                             STATUS   ROLES    AGE     VERSION
ip-173-19-35-156.eu-central-1.compute.internal   Ready    master   10m     v1.20.1
ip-172-36-23-149.eu-central-1.compute.internal   Ready    node     5m38s   v1.20.1
Kubernetes クラスターで実行されているすべてのポッドを確認できます。
 @ip-170-11-26-119:~$ kubectl get pods --all-namespaces
NAMESPACE     NAME                                                                     READY   STATUS    RESTARTS   AGE
kube-system   dns-controller-8d8889c4b-xp9dl                                           1/1     Running   0          8m26s
kube-system   etcd-manager-events-ip-173-19-35-156.eu-central-1.compute.internal       1/1     Running   0          10m
kube-system   etcd-manager-main-ip-173-19-35-156.eu-central-1.compute.internal         1/1     Running   0          10m
kube-system   kops-controller-9skdk                                                    1/1     Running   3          6m51s
kube-system   kube-apiserver-ip-173-19-35-156.eu-central-1.compute.internal            2/2     Running   0          10m
kube-system   kube-controller-manager-ip-173-19-35-156.eu-central-1.compute.internal   1/1     Running   6          10m
kube-system   kube-dns-696cb84c7-g8nhb                                                 3/3     Running   0          4m27s
kube-system   kube-dns-autoscaler-55f8f75459-zlxbr                                     1/1     Running   0          7m18s
kube-system   kube-proxy-ip-173-19-35-156.eu-central-1.compute.internal                1/1     Running   0          10m
kube-system   kube-proxy-ip-172-36-23-149.eu-central-1.compute.internal                1/1     Running   0          7m2s
kube-system   kube-scheduler-ip-173-19-35-156.eu-central-1.compute.internal            1/1     Running   5          10m
クラスターを削除する
Kubernetes クラスターの作成と同様に、Kops を使用した Kubernetes クラスターの削除は非常に簡単です。この kops delete コマンドは、クラスターのすべてのクラウド リソースとクラスター レジストリ自体を削除します。
 @ip-170-11-26-119:~$ kops delete cluster --name geekdemo1.k8s.local --yes
TYPE                    NAME                                                                            ID
autoscaling-config      master-eu-central-1a.masters.geekdemo1.k8s.local                                lt-0cc11aec1943204e4
autoscaling-config      nodes-eu-central-1a.geekdemo1.k8s.local                                         lt-0da65d2eaf6de9f5c
autoscaling-group       master-eu-central-1a.masters.geekdemo1.k8s.local                                master-eu-central-1a.masters.geekdemo1.k8s.local
autoscaling-group       nodes-eu-central-1a.geekdemo1.k8s.local                                         nodes-eu-central-1a.geekdemo1.k8s.local
dhcp-options            geekdemo1.k8s.local                                                             dopt-0403a0cbbfbc0c72b
iam-instance-profile    masters.geekdemo1.k8s.local                                                     masters.geekdemo1.k8s.local
iam-instance-profile    nodes.geekdemo1.k8s.local                                                       nodes.geekdemo1.k8s.local
iam-role                masters.geekdemo1.k8s.local                                                     masters.geekdemo1.k8s.local
iam-role                nodes.geekdemo1.k8s.local                                                       nodes.geekdemo1.k8s.local
instance                master-eu-central-1a.masters.geekdemo1.k8s.local                                i-069c73f2c23eb502a
instance                nodes-eu-central-1a.geekdemo1.k8s.local                                         i-0401d6b0d4fc11e77
iam-instance-profile:nodes.geekdemo1.k8s.local  ok
load-balancer:api-geekdemo1-k8s-local-dason2    ok
iam-instance-profile:masters.geekdemo1.k8s.local        ok
iam-role:masters.geekdemo1.k8s.local    ok
instance:i-069c73f2c23eb502a    ok
autoscaling-group:nodes-eu-central-1a.geekdemo1.k8s.local       ok
iam-role:nodes.geekdemo1.k8s.local      ok
instance:i-0401d6b0d4fc11e77    ok
autoscaling-config:lt-0cc11aec1943204e4 ok
autoscaling-config:lt-0da65d2eaf6de9f5c ok
autoscaling-group:master-eu-central-1a.masters.geekdemo1.k8s.local      ok
keypair:key-0d82g920j421b89dn   ok
Deleted kubectl config for geekdemo1.k8s.local

Deleted cluster: "geekdemo1.k8s.local"
結論
Kops に関するこの記事が役に立ち、今日何か新しいことを学ぶことができれば幸いです。 Kops は、クラウド上で Kubernetes を操作するための素晴らしいツールです。したがって、この記事で説明されている手順を試して、Kops を使用して AWS 上に Kubernetes クラスターをセットアップしてください。


")
![2021 年に Raspberry Pi Web サーバーをセットアップする方法 [ガイド]](https://i0.wp.com/pcmanabu.com/wp-content/uploads/2019/10/web-server-02-309x198.png?w=1200&resize=1200,0&ssl=1)


