Learn what MongoDB is, installation guide, and basic operations.
MongoDB NoSQL is trending more than ever. Do you have the necessary understanding?
If not, don’t worry. The following may help:

introduction
As websites undergo a paradigm shift towards dynamic content, the demand for No-SQL databases increases. This has given rise to a number of No-SQL databases such as MongoDB .
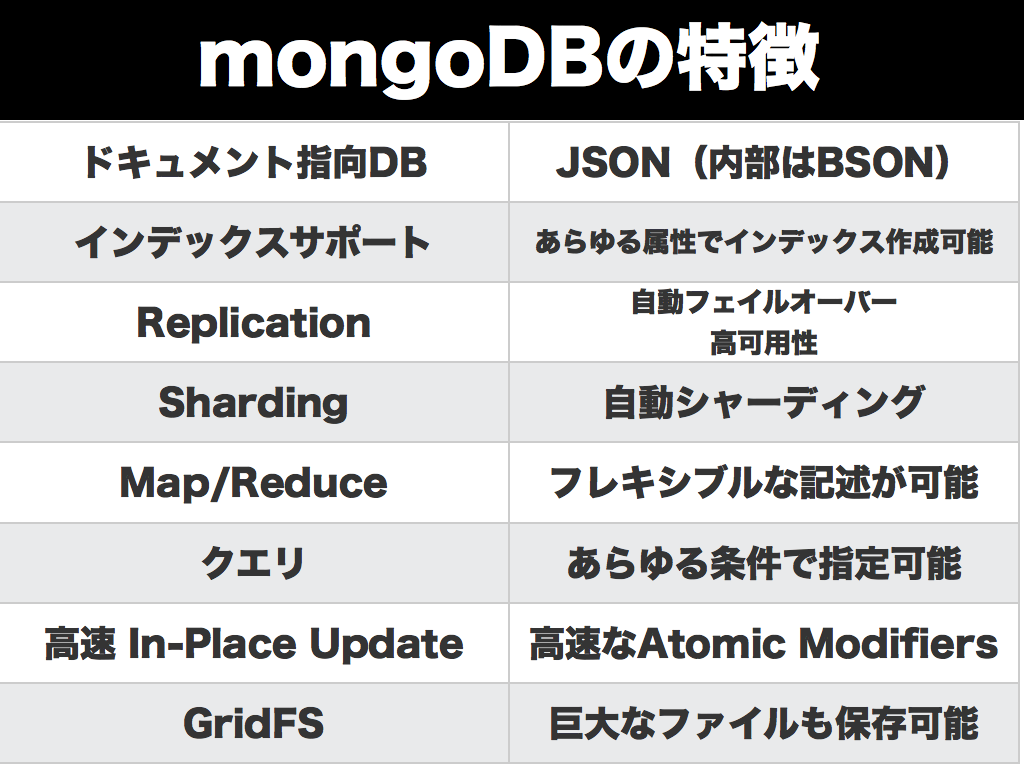
Classified as a No-SQL database, MongoDB is a document-based database that stores data in the form of JSON documents with automatically generated identifiers for each document.
No-SQL databases are databases that do not have a fixed table structure, unlike structured SQL databases. MongoDB stores data in the form of JSON strings, regardless of the number of attributes in a particular column or the names of the attributes.
This allows developers to quickly make changes to entities without changing the database level.
Installing MongoDB
MongoDB, like any database, comes in multiple variations depending on your development needs. The variants are listed below and can be used or downloaded from this link .
- MongoDB Atlas – Database as a Service
- Community Server – Free to use for our community of developers
- MongoDB Enterprise Edition – commercial version with additional features
Each of these is fully compatible with any operating system. First, start installing the Community Server and download the relevant installation files depending on your operating system.
The installation process is slightly different for each operating system, so perform the installation for each operating system separately.
Installation on MacOS
How to install MongoDB on MacOS. Download the .tgz archive containing the required binaries. Once you unzip the file, you will be able to see a number of binaries located in the bin folder.
- Move the bin folder to the desired location
- Open a terminal and change directories to the bin directory mentioned above.
- Run the command below to create a database in any location.
$ ./mongod --dbpath /path-to-desired-directory/In the above command, replace the path to the directory with your desired path and the server will start as soon as the command is executed.
Installation on Windows
The MongoDB Download Center provides executable .msi packages for installing MongoDB on Windows. Installation on Windows is very easy and once you have downloaded the setup you can run it using a few commands.
- Install MongoDB on your Windows PC/server by running the command below.
 > cd /setup-folder/
> msiexec.exe /q /i .msi ^
INSTALLLOCATION="C:Program FilesMongoDB" ^
ADDLOCAL="MonitoringTools,ImportExportTools,MiscellaneousTools"
The above command will change to the corresponding directory and run the setup to install in the specified location. Once installed, you need to configure the default database storage path for MongoDB.
The commands below will help you configure the same.
> md dbdataThe above command will create a db/data folder in the directory that the command prompt is currently pointing to. If you need to reconfigure the database again, you can use mongod.exe with the dbpath argument as shown below.
>"C:Program FilesMongoDBbinmongod.exe" --dbpath d:tutorialmongodbdataInstallation on Linux
Similar to the macOS download, MongoDB for Linux variants are also available in the form of a bunch of archived binaries. The process for installing MongoDB is very similar.
- Move the binaries to the desired location
- Open a terminal inside the folder
- Run the following command specifying the desired DB location.
$ ./mongod --dbpath /path-to-desired-directory/Creating your first collection
MongoDB stores data in the form of JSON documents. Groups of such documents are collectively known as collections in MongoDB. Therefore, collections are similar to tables in a relational database, and documents are similar to records.
To save documents, you must first create a collection. What’s interesting about NoSQL databases is that unlike SQL databases, you don’t have to specify column names or data types.
The first step to creating a collection is to create a database. To create a database and connect to it using the command line, run the following command from the home directory of your MongoDB installation:
$ ./bin/mongo tutorialThis command is used to simultaneously start a database connection and connect to the tutorial database. You will see many lines in the log indicating that the command line has connected to the MongoDB database.
A sample command line image is provided below to give you a better understanding of the same.
- To create the collection, run the following command:
$ > db.createCollection('firstCollection');This is how you create an empty collection. The next step is to use the MongoDB command line to insert data and perform some processing on the records.
Insert a document into a collection
As explained above, you can insert almost any JSON into any MongoDB collection.
Let’s start by inserting our first JSON document into the firstCollection collection created above.
> db.firstCollection.insertOne({name:'Abhishek',skill:'MongoDB'});The above command inserts a single JSON document into firstCollection . You can check the same using the command given below.
> db.firstCollection.find(); The above command has multiple uses depending on the variation of find() function. If no arguments are specified as in the above command, all available documents from the collection will be fetched.
You can also insert one more record and try the same thing. When you run this, the output of the above command will look like this:
 > db.firstCollection.find();
{ "_id" : ObjectId("5b043a32c29a7184535e783a"), "name" : "Abhishek", "skill" : "MongoDB" }
{ "_id" : ObjectId("5b05b4f0c29a7184535e783b"), "name" : "GeekFlare", "skill" : "Java,MongoDB,NodeJS" }
As you can see, there are two records available. find() function makes it easy to filter documents based on specific parameters. Let’s filter the documents using the name attribute.
Filtering is simple and can be understood with the command below.
 db.firstCollection.find({name:'Abhishek'});
{ "_id" : ObjectId("5b043a32c29a7184535e783a"), "name" : "Abhishek", "skill" : "MongoDB" }
Filters can also be used with multiple attributes in JSON. You can add any number of parameters to the query, but the limitation of this approach is that it only matches the exact value of the attribute.
Filtering records using regular expressions
To perform the MongoDB equivalent of MySQL- like clauses, MongoDB uses regular expressions. A regular expression is a sequence of characters that forms a matching pattern. Regular expression literals are similar to those used in JavaScript .
The current collection attempts to fetch data that matches the skill attribute pattern. The following command gets a list of people with MongoDB skills. So two records are fetched because both records contain the string MongoDB.
 > db.firstCollection.find({skill:/.*MongoDB.*/});
{ "_id" : ObjectId("5b043a32c29a7184535e783a"), "name" : "Abhishek", "skill" : "MongoDB" }
{ "_id" : ObjectId("5b05b4f0c29a7184535e783b"), "name" : "GeekFlare", "skill" : "Java,MongoDB,NodeJS" }
> db.firstCollection.find({skill:/.*Java.*/});
{ "_id" : ObjectId("5b05b4f0c29a7184535e783b"), "name" : "GeekFlare", "skill" : "Java,MongoDB,NodeJS" }
The above code displays the results of two different strings in regular expression format. The first query retrieves a list of documents with the keyword MongoDB in the skill attribute, and the second query retrieves users with Java-only skills.
The next challenge for condition-based queries is to run queries using OR or AND conditions.
MongoDB complex queries
As is clear from the above command, MongoDB’s where clause works for JSON. The process of combining conditions also relies on the JSON itself. MongoDB provides operators such as $or, $and, and $not to perform related query operations.
Let’s get a list of documents that have Abhishek in the name attribute or Java in the skill.
 > db.firstCollection.find({$or: [{name:'Abhishek'},{skill:/.*Java.*/}]});
{ "_id" : ObjectId("5b043a32c29a7184535e783a"), "name" : "Abhishek", "skill" : "MongoDB" }
{ "_id" : ObjectId("5b05b4f0c29a7184535e783b"), "name" : "", "skill" : "Java,MongoDB,NodeJS" }
As you can see, both records are retrieved. Try using the name attribute as , and check the changes. Only documents with three skills and the name are displayed.
Similarly, you can use $and operator with a JSON array of conditions as shown above.
The next set of operators requires you to create another collection and add some records to it using the command below.
 > db.createCollection('studentmarks');
{ "ok" : 1 }
> db.studentmarks.insertMany([{name:'A',marks:20},{name:'B',marks:25},{name:'C',marks:22},{name:'D',marks:30}]);
{
	"acknowledged" : true,
	"insertedIds" : [
		ObjectId("5b06e7b5c29a7184535e783c"),
		ObjectId("5b06e7b5c29a7184535e783d"),
		ObjectId("5b06e7b5c29a7184535e783e"),
		ObjectId("5b06e7b5c29a7184535e783f")
	]
}
The next set of operators we’ll use are comparison operators in queries. To compare values using conditions such as less than or equal to, greater than or equal to, or not equal to, use operators related to the values you pass.
Below is an example to get a list of students with more than 22 points.
 db.studentmarks.find({marks:{$gt:22}});
{ "_id" : ObjectId("5b06e7b5c29a7184535e783d"), "name" : "B", "marks" : 25 }
{ "_id" : ObjectId("5b06e7b5c29a7184535e783f"), "name" : "D", "marks" : 30 }
$gt here indicates greater than the standard. Therefore, documents with more than 22 marks are displayed. There are other operators available as well. They are listed below.
| operator | use | example |
|---|---|---|
| $eq | Check if values are equal | {mark:{$eq:20}} |
| $lt | Check if value is less than or equal to | {mark: {$lt:20}} |
| $gte | Checks if the value is greater than or equal to | {mark:{$gte:22}} |
| $lte | Checks if the value is less than or equal to | {mark:{$lte:22}} |
| $ne | Check that value is not equal to | {mark:{$ne:22}} |
| $in | Checks if a value is equal to any value in the array | {mark:{$in:[20,22]}} |
| $9 | Checks that the value is not equal to any value in the array | {mark:{$nin:[22,25]}} |
Explore more MongoDB commands here.
MongoDB GUI
In the above discussion, we used the command line to query MongoDB.
For complex queries or large amounts of data, using the command line can become difficult. To make it easier to view and query your data, MongoDB provides a great GUI tool called MongoDB Compass.
MongoDB Compass can be easily downloaded from the MongoDB download site . Once you have downloaded and installed MongoDB Compass, start the application and you will see a screen similar to the one below.

Considering the MongoDB server is up and running, click Connect with the default details. Once you log in, you will see a list of available databases.
Click Tutorial Database to see the list of collections in the tutorial database. You will see a list of collections available in the tutorial database, as shown below.
Click on a collection to see a list of documents with the controls you need to filter records using JSON. It also has the ability to view documents in JSON or tabular format at your convenience.
The GUI also makes adding documentation easy. Simply click the Insert Document button on the screen shown below. A small dialog opens asking for document details using the automatically generated document ID.
The GUI simplifies many operations that can be difficult to perform using the MongoDB command-line interface.
Explore other NoSQL clients.
conclusion
We captured the essence of NoSQL through various examples and understood how installation and documentation differ from typical relational database records. Also check out our online course to learn MongoDB from scratch.
If you are a developer, you may be interested in this.


![How to set up a Raspberry Pi web server in 2021 [Guide]](https://i0.wp.com/pcmanabu.com/wp-content/uploads/2019/10/web-server-02-309x198.png?w=1200&resize=1200,0&ssl=1)

")


 in Roblox")
")


")


")


")
