Did you know that Bitcoin is built on a blockchain? Today we will be building a blockchain from scratch using Python.
What is blockchain?
In 2008, a Bitcoin paper was published by an unknown individual or group named Satoshi Nakamoto. Bitcoin emerged as a peer-to-peer version of electronic money that allows transactions without a central authority (bank). Most people don’t know that in the same paper, Satoshi defined a decentralized method of storing information, today known as blockchain.

Simply put, blockchain is a shared, immutable digital ledger that stores transactions on a distributed network of computers.
Blockchain can be broken down into two simple terms.
- Block: space to store transactions
- chain: a set of linked records
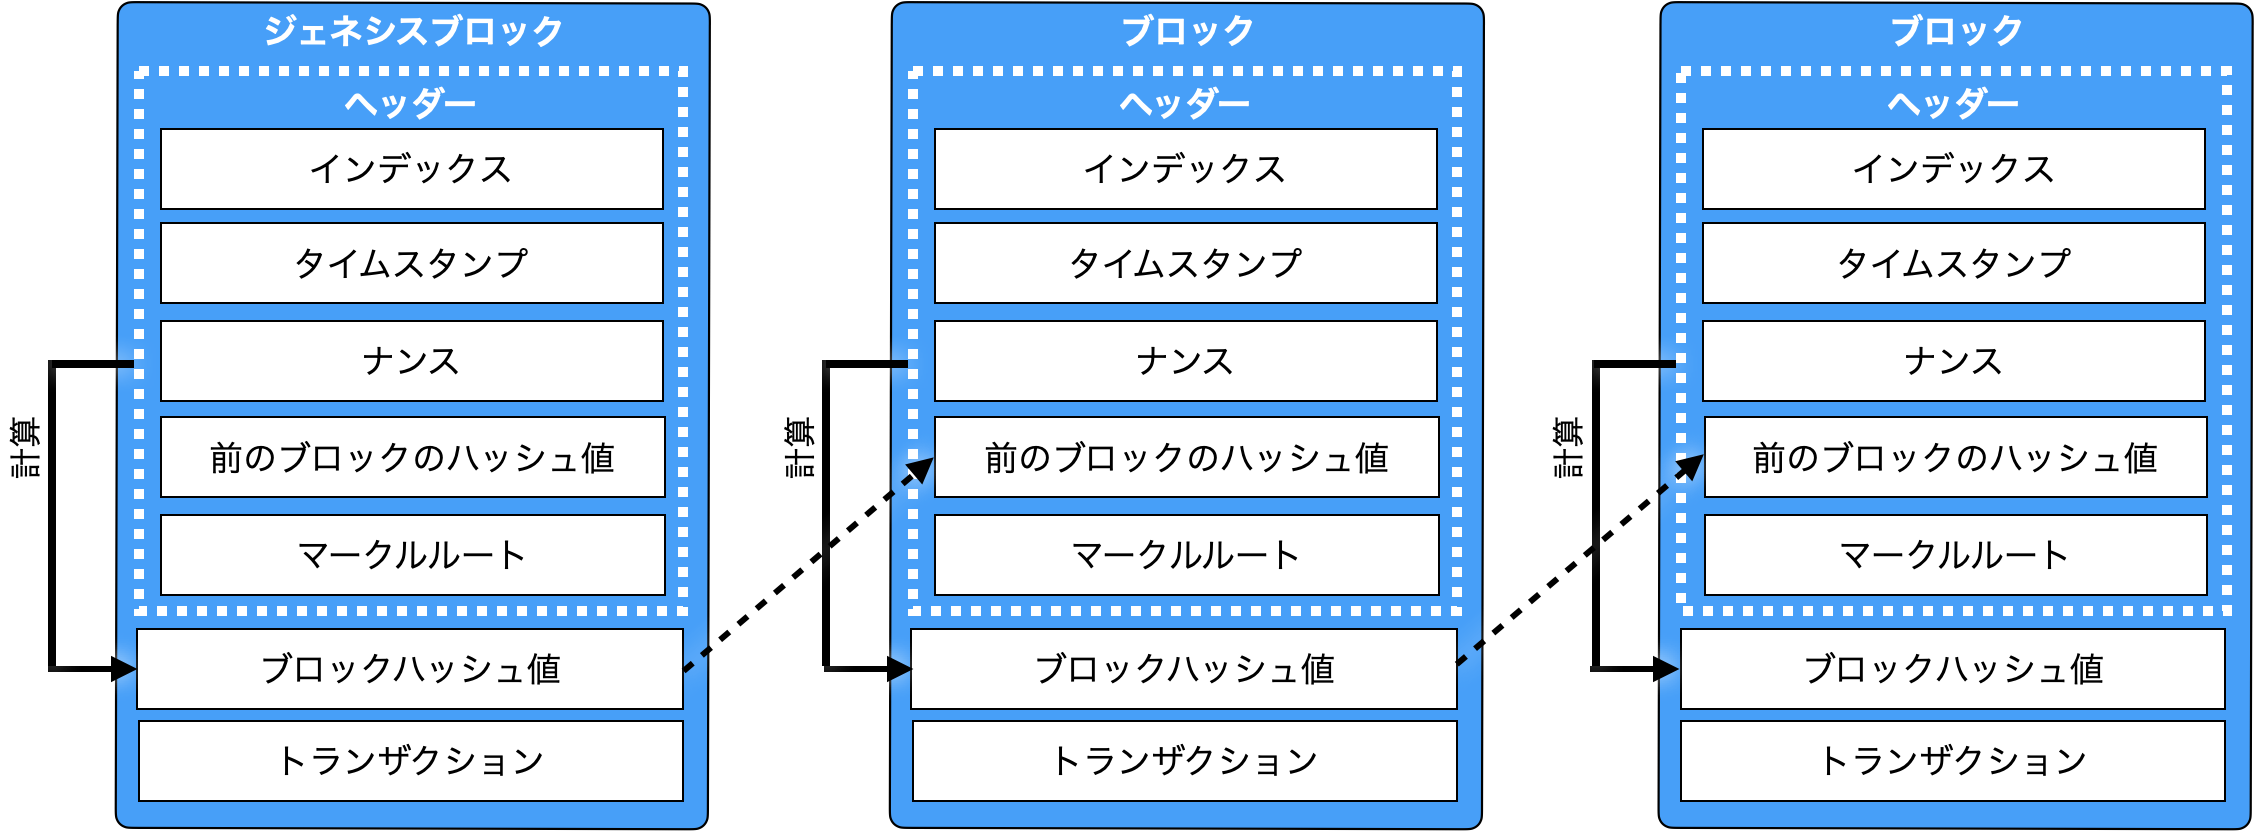
It defines a blockchain as a chain of linked blocks, where each block stores transactions made with certain parameters.
Each block builds on top of another, creating an irreversible chain of blocks. In other words, every block depends on another block. This creates a robust, immutable system whose integrity can be verified by anyone with appropriate privileges.
Blockchain introduces an interesting set of features.
- immutability of history
- Persistence of information
- There are no errors in the saved data
Many systems currently rely on blockchain, including cryptocurrencies, asset transfers (NFTs), and perhaps in the near future, voting.
Note that a Python blockchain doesn’t have to be a complex program with thousands of lines of code. At its core is a list of interlinked transactions.
Of course, this was a brief explanation, but if you want a complete guide, we have created a complete tutorial on blockchain for beginners. Please check it out.
Let’s start building a simple blockchain using Python.
Build a blockchain with Python
Before we begin, let’s define what we will do in this tutorial.
- Build a simple blockchain system written in Python
- Use blockchain with pre-established transactions expressed as strings
- Test blockchain immutability
Use Python lists instead of JSON. This simplifies the process and allows you to focus on applying blockchain key concepts.
What you need to follow this tutorial:
- Understanding Python classes and methods
- Basic usage of the command line
Creating a Block class
Open your favorite code editor and create a main.py file. This will be the file you will be working with.
Next, import hashlib , a module that allows you to create one-way encrypted messages. Through cryptographic techniques such as hashing, blockchain creates secure transactions.
A hash function is an algorithm that takes data (usually an encoded string) and returns a unique identifier, often named a “digest” or “signature.” This last part is very important. In a hash function, small differences in the inputs produce radically different identifiers as outputs. We’ll look at this in action later.
Here we just import the built-in module hashlib.
 # main.py file
"""
A simple Blockchain in Python
"""

import hashlib
This module contains most of the hashing algorithms you need. Note that it uses the hashlib.sha256() function.
Now let’s talk about GeekCoinBlock, a completely original blockchain name.
 class GeekCoinBlock:

    def __init__(self, previous_block_hash, transaction_list):

        self.previous_block_hash = previous_block_hash
        self.transaction_list = transaction_list

        self.block_data = f"{' - '.join(transaction_list)} - {previous_block_hash}"
        self.block_hash = hashlib.sha256(self.block_data.encode()).hexdigest()
I’m aware that this can make your code clunky. Let’s take a closer look at each part in the next sections.
Geek Coin Block Description
First, create a class named GeekCoinBlock that is a wrapper around an object with certain characteristics (attributes) and behavior (methods).
Next, define an __init__ method (also known as a constructor) that will be called whenever a GeekCoinBlock object is created.
This method has three parameters.
- self (instance of each object)
- previous_block_hash (reference to previous block)
- transaction_list (list of transactions made in the current block).
Save a list of previous hashes and transactions and create an instance variable block_data as a string. This does not happen with real cryptocurrencies. Cryptocurrencies store that kind of data as separate hashes, but for simplicity, we store every block of data as a string.
Finally, create a block_hash that other blocks will use to continue the chain. This is where hashlib comes in handy. Instead of creating a custom hash function, you can use the pre-built sha256 to create immutable blocks.
This function takes an encoded string (or bytes) as a parameter. That’s why I’m using the block_data.encode() method. Then call hexdigest() to return the encoded data in hexadecimal format.
Doing all of this can be a pain, so let’s try using hashlib in the Python shell.
 In [1]: import hashlib

In [2]: message = "Python is great"

In [3]: h1 = hashlib.sha256(message.encode())

In [4]: h1
Out[4]: <sha256 ... object @ 0x7efcd55bfbf0>

In [5]: h1.hexdigest()
Out[5]: 'a40cf9cca ... 42ab97'

In [6]: h2 = hashlib.sha256(b"Python is not great")

In [7]: h2
Out[7]: <sha256 ... object @ 0x7efcd55bfc90>

In [8]: h2.hexdigest()
Out[8]: 'fefe510a6a ... 97e010c0ea34'
As you can see, slightly changing the input, such as from “Python is great” to “Python is bad,” can produce completely different hashes. This all concerns the integrity of the blockchain. Introducing small changes to the blockchain will dramatically change its hash. This is why the adage “You can’t corrupt the blockchain” is true.
Using the Block class
We’ll build the entire Blockchain class later, but for now let’s use the Block class to create a chain of blocks (Blockchain).
Within the same file, create several transactions consisting of simple strings stored in variables. For example:
 class GeekCoinBlock:
    ...

t1 = "Noah sends 5 GC to Mark"
t2 = "Mark sends 2.3 GC to James"
t3 = "James sends 4.2 GC to Alisson"
t4 = "Alisson sends 1.1 GC to Noah"
Of course, GC refers to GeekCoin.
Next, we use the GeekCoinBlock class to construct the first block of the blockchain and print its attributes. Consider that the previous_hash parameter of a genesis block (the first block that precedes other blocks) is always an arbitrary string or hash (in this case “firstblock”).
 block1 = GeekCoinBlock('firstblock', [t1, t2])

print(f"Block 1 data: {block1.block_data}")
print(f"Block 1 hash: {block1.block_hash}")
Then do the same thing with the second block, but pass the first block’s hash as the previous_hash argument.
 block2 = GeekCoinBlock(block1.block_hash, [t3, t4])

print(f"Block 2 data: {block2.block_data}")
print(f"Block 2 hash: {block2.block_hash}")
Let’s run and analyze the output from this piece of code. Enter terminal again.
 ❯ python main.py
Block 1 data: Noah sends 5 GC to Mark - Mark sends 2.3 GC to James - firstblock
Block 1 hash: 01e4e15242a9601725f4a86ca01fbddaaec7105b442955bb0efcadbfc759806d
Block 2 data: James sends 4.2 GC to Alisson - Alisson sends 1.1 GC to Noah - 01e4e15242a9601725f4a86ca01fbddaaec7105b442955bb0efcadbfc759806d
Block 2 hash: 448c4306caf7f6937b0307f92f27fbea3bb73b3470363dee5026a1209dadcfa8
For now, only text and a few 64-character hashes are visible, but this roughly replicates the blockchain mechanism.
We start with the Genesis block, which is the foundation for all other blocks.
Blockchain is a very secure system because anyone can verify the integrity of the chain. For example, if you change the contents of the transaction slightly, it will look like this:
t2 = "Mark sends 2.3 GC to James" -> t2 = "Mark sends 3.2 GC to James" We see a dramatic change in the hash of the block.
 Block 1 data: Noah sends 5 GC to Mark - Mark sends 3.2 GC to James - firstblock
Block 1 hash: 7a990bf1d70230bf2dad6160496c0b3046da7a17b1281fd1d4c63d4eac58e78c
Block 2 data: James sends 4.2 GC to Alisson - Alisson sends 1.1 GC to Noah - 7a990bf1d70230bf2dad6160496c0b3046da7a17b1281fd1d4c63d4eac58e78c
Block 2 hash: 569b977306ce88b53e001dca7ba00c03a51c60d6df4650e7657dcd136f2da0ac
The current project can be found in this GitHub repository .
blockchain coding
Establishing system integrity based on manually coded variables is not very wise, so a different approach is required.
There are blocks. It’s time to build a class that connects them to the blockchain.
First, let’s delete the previous transaction and block object, then use the code below.
 # main.py

class Blockchain:
    def __init__(self):
        self.chain = []
        self.generate_genesis_block()

    def generate_genesis_block(self):
        self.chain.append(GeekCoinBlock("0", ['Genesis Block']))

    def create_block_from_transaction(self, transaction_list):
        previous_block_hash = self.last_block.block_hash
        self.chain.append(GeekCoinBlock(previous_block_hash, transaction_list))

    def display_chain(self):
        for i in range(len(self.chain)):
            print(f"Data {i + 1}: {self.chain[i].block_data}")
            print(f"Hash {i + 1}: {self.chain[i].block_hash}\n")

    @property
    def last_block(self):
        return self.chain[-1]
This is also a huge piece of code. Let’s break down each part.
- self.chain — List where all blocks are recorded. Each block can be accessed via the list index.
- generate_genesis_block — Adds genesis or first block to the chain. The hash before the block is ‘0’ and the list of transactions is simply ‘Genesis Block’.
- create_block_from_transaction — This allows you to add blocks to the chain using just the list of transactions. It is very tedious to manually create a block every time you record a transaction.
- display_chain — Prints a chain of blocks using a for loop.
- last_block — Property that allows access to the last element of the chain. I used this in create_block_from_transaction method.
Let’s test this blockchain.
 # main.py

import hashlib

class GeekCoinBlock:
    ...


class Blockchain:
    ...

t1 = "George sends 3.1 GC to Joe"
t2 = "Joe sends 2.5 GC to Adam"
t3 = "Adam sends 1.2 GC to Bob"
t4 = "Bob sends 0.5 GC to Charlie"
t5 = "Charlie sends 0.2 GC to David"
t6 = "David sends 0.1 GC to Eric"

myblockchain = Blockchain()

myblockchain.create_block_from_transaction([t1, t2])
myblockchain.create_block_from_transaction([t3, t4])
myblockchain.create_block_from_transaction([t5, t6])

myblockchain.display_chain()
Next, run the main.py file.
 Data 1: Genesis Block - 0
Hash 1: 39331a6a2ea1cf31a5014b2a7c9e8dfad82df0b0666e81ce04cf8173cc5aed3e

Data 2: George sends 3.1 GC to Joe - Joe sends 2.5 GC to Adam - 39331a6a2ea1cf31a5014b2a7c9e8dfad82df0b0666e81ce04cf8173cc5aed3e
Hash 2: 98cf363aecb33989aea0425a3c1287268bd86f63851bc08c0734a31db08506d5

Data 3: Adam sends 1.2 GC to Bob - Bob sends 0.5 GC to Charlie - 98cf363aecb33989aea0425a3c1287268bd86f63851bc08c0734a31db08506d5
Hash 3: 6f1cfcc3082488b97db8fdf8ed33f9ac7519be3e285a37a6fcc2f1904f373589

Data 4: Charlie sends 0.2 GC to David - David sends 0.1 GC to Eric - 6f1cfcc3082488b97db8fdf8ed33f9ac7519be3e285a37a6fcc2f1904f373589
Hash 4: 869df2f03c9860767d35b30a46233fbeea89a3000ae5019d1491e3829d1ab929
Congratulations! 🙌 We created a simple Python blockchain from scratch.
Getters and setters can now be used to enforce blockchain immutability and implement other features such as proof of work, mining, or other concepts discussed in the Bitcoin mining basics article. Ta.
conclusion
Blockchain is the technology behind Bitcoin, Ethereum, and all other cryptocurrencies. In this article, you learned how to create a blockchain in Python using hashing algorithms such as sha256 , classes, and objects.
Your task is to create a mining system. Why not implement it with a REST API using a framework like Django or Flask?
Many people are building wealth with cryptocurrencies. Imagine what you could do if you created your own! 🤑
Keep coding! 👨💻


![How to set up a Raspberry Pi web server in 2021 [Guide]](https://i0.wp.com/pcmanabu.com/wp-content/uploads/2019/10/web-server-02-309x198.png?w=1200&resize=1200,0&ssl=1)

")


 in Roblox")
")


")


")


")
