We previously talked about how to overclock your graphics card, and today we’ll talk about how to lower the voltage on your GPU. This article contains a complete step-by-step process to enable your graphics card to operate at lower voltages and at lower temperatures. Since changing the voltage changes the core functionality of the hardware, there are many factors to consider when attempting this process. We’ll make sure to guide you through the correct steps to safely undervolt your Nvidia, AMD, or Intel graphics card.
Undervolting can be a messy process if done incorrectly. If you do not reduce the voltage settings by the correct increments, your PC may experience system crashes or graphical glitches. However, with that said, let’s quickly walk through the process step by step. 
What to do before your GPU drops voltage
- Make sure your graphics card is installed correctly. Check out our guide on how to install a GPU on your PC.
- Download and install the following programs on your Windows system.
- MSI afterburner for undervoltage processes.
- HWiNFO for monitoring voltage, temperature, etc.
- 3DMark Basic Edition for GPU stress testing and ensuring stability
Step-by-step guide to lowering GPU voltage
Step 1: Get the GPU’s current voltage settings
First, start HWiNFO. At startup, select Sensors Only and click Start. Next, open 3DMark and run the Time Spy benchmark. Once done, go to HWiNFO and scroll down to find GPU Core Voltage and GPU Clock . Now note down the value under the ” Maximum ” column. You now have the current voltage settings for the maximum GPU frequency your card will operate at.
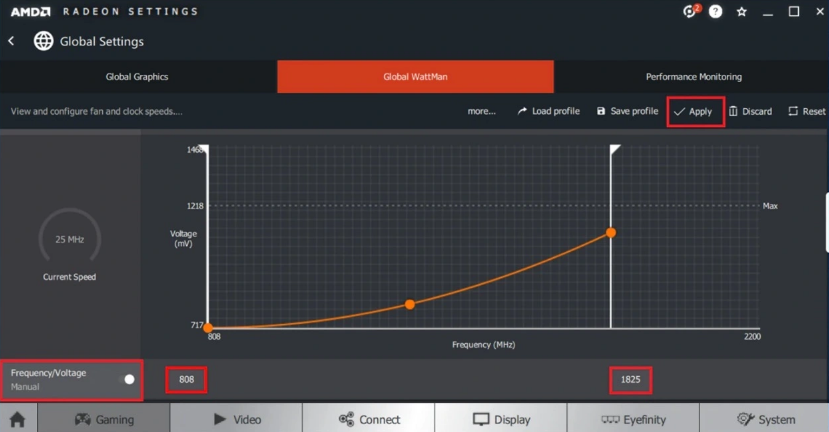
Step 2: Open the Curve Editor in MSI Afterburner
Next, launch MSI Afterburner and click on the “ Curve Editor ” option. But don’t be afraid. Things get a little more complicated, but you can quickly learn how to lower the voltage on your GPU.
This curve graph representing the GPU voltage vs. frequency curve shows many squares corresponding to different points. You need to understand which point corresponds most closely to the GPU’s standard voltage and frequency settings described in the previous step. The demo below shows what this means for GPUs. By the way, GPUs work dynamically, so some variation is expected and normal.
Step 3: Adjust GPU voltage in MSI Afterburner
Now click on the square corresponding to approximately 10 or 20 mV lower voltage increment (visible on the Y-axis). This is the recommended increment when starting undervoltage. In this example, the stock voltage is 1081mV, so we chose the square that corresponds to 1068mV. This will be -13mV.
If you are confused, please see the demo below. The original point and the low voltage point that we will modify in the next step are highlighted.
Press the up arrow key until the square corresponds to the stock core clock you noted in step 1. Then select all the square points on the right and move them up or down as needed to make sure they are on the same frequency . This prevents the GPU from being boosted above its core clock frequency.
Essentially, when you do this, your GPU runs at the stock core clock , but at a lower voltage setting . Therefore, the GPU will be underpowered. Don’t close anything yet, read the next steps to apply this setting.

To apply undervolts, drag the Voltage/Frequency Curve Editor window to the left (do not close it) to display the MSI Afterburner window. Then click the checkmark next to the Save button to apply the settings, and MSI Afterburner will automatically adjust the entire curve based on these settings. Now save this profile by clicking Save and then clicking one of the numbers on the right.
Step 4: GPU Benchmarking and Undervoltage Adjustment
Let’s test this GPU undervolt configuration. Launch 3DMark again and this time run a 30 minute stress test on the GPU to check its stability at this voltage setting.
To do this, go to Benchmark , click Time Spy, and click Custom Run. Now click on the “ Enable Loop ” setting to enable it. Next, click “Run Custom” to start the stress test. Close the 3DMark Time Spy benchmark after running the app for 30 minutes.
If conditions are stable and the PC does not crash, further undervoltage may occur. Repeat step 3, but first you must click the Reset (↺) button to restore the settings. This time you can choose a square with a lower voltage increment, but be careful to only go down by about 10 or 20 mV.
Apply the settings and test again for 30 minutes using 3DMark Time Spy as described in step 4. If your PC doesn’t crash or issue, repeat this entire process. Last stable configuration I’ve already tested.
If you experience system shutdowns or display or graphics glitches, it means your GPU has reached its maximum undervoltage potential. In our case, we experienced instability below 950mV, so we decided to settle on 975mV as the final undervolt setting and further optimized it by increasing the frequency slightly at 1950MHz.
When we measured this, we found that we were able to keep the GPU voltage down by 106mV, which is a very solid result . So this final undervolt setting gives you the same GPU performance, but with significantly lower temperatures and noise levels.

Note : Once you have your final underbolt settings, remember to save them as shown at the end of step 3.
And voila! The GPU downvoltage process is complete. In the next section, we present benchmark results for our graphics cards to measure how much GPU power consumption and temperature has decreased.
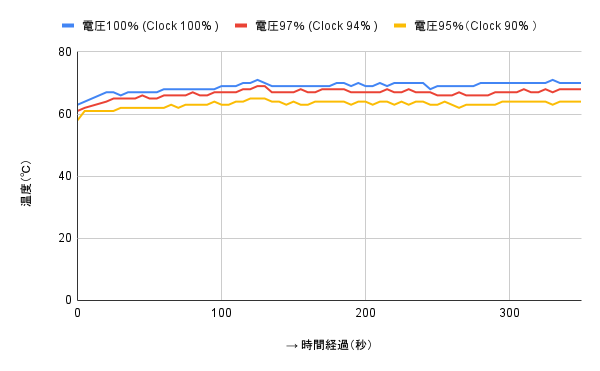
Step 5: Check temperature after GPU undervoltage
As shown below, we observed a 4.1 degree Celsius drop in GPU core temperature. GPU hotspot temperatures dropped 5.1 degrees Celsius before approaching 90 degrees Celsius. This is a decent result and clearly shows the benefits of undervolting your graphics card. The GPU, the RTX 3070 Ti, is very efficient and works well, but the coil whine issue is annoying.
This UV setting allows you to use lower manual fan settings and ensures temperatures never exceed 85 degrees Celsius, even during GPU-intensive tasks such as gaming and content creation. Therefore, the noise generated is reduced and the problem of coil whine is also eliminated.
For many other users, undervolting is even more beneficial, especially if you have GPUs that are less efficient or run at higher temperatures. For example, QuasarZone.com investigated undervoltage on the RTX 4090 and observed that the undervoltage and lower power limit significantly reduced power consumption , resulting in only 8% GPU performance loss . Therefore, there is less heat and a more desirable temperature.
FAQ
Yes, it is safe to lower the GPU voltage as long as you increase it gradually and settle on a stable setting.
Some PCs have overheating issues, which can be easily resolved by undervolting them. This means your PC will run cooler and maintain its original performance level after GPU starvation, which will definitely increase your FPS.
If your GPU voltage is too low, your PC may experience stability issues, graphics glitches, or random system shutdowns. In such cases, you will need to revert to stock settings or optimize the underbolt so that instability is no longer present.
Reducing the GPU voltage in small, healthy increments can reduce GPU temperature. What’s more, your fans will last longer because they spin 100% less frequently. Many users’ experience has shown that lower temperatures increase lifespan, while overheating can cause premature hardware failure.
This should be determined by the user based on personal preference. Are you satisfied with your current performance level? Next, reduce the voltage on your GPU. If not, try overclocking instead.
Yes, games and other programs may crash due to insufficient voltage if the voltage settings are unstable. If you don’t have enough voltage to run your GPU at stock clocks, it definitely indicates an unstable undervoltage.


![How to set up a Raspberry Pi web server in 2021 [Guide]](https://i0.wp.com/pcmanabu.com/wp-content/uploads/2019/10/web-server-02-309x198.png?w=1200&resize=1200,0&ssl=1)

")


 in Roblox")
")


")


")


")
