Modding Bethesda games has become a long-standing tradition, and Starfield is no exception. Although it’s new to its predecessor, modders have already gotten their hands on the game (ahead of its official release) and have slowly started building mods to expand its in-game functionality. Bethesda is promising full modding support, so learn how to prepare your copy of Starfield for modding. So without further ado, let’s learn how to install mods in Starfield.
Before proceeding, you should take some precautions that we also took in our Baldur’s Gate 3 modding guide. This ensures that if you accidentally corrupt a game file, you can roll back to the original file. Additionally, note that Skyrim does not have MOD files per se like Skyrim’s SKSE or Fallout’s FOSE. This guide does not cover such files. 
Don’t forget to backup your game files before modding
First, you need to update your game to the latest version. Next, back up your original game files so you can restore Starfield to its original state if something goes wrong. That is, you need to do the following:
- To check your game version, right-click Starfield on Steam and go to Properties .
- Then select “Update” to check the game version. At the time of writing, Starfield’s build ID in Early Access is 12051365 .
- Next, go back to Steam and right-click on Starfield again.
- Now select Manage and select the Browse local files option.
- Select all in File Explorer and copy the files to another location.
Finally, be sure to create a separate save file without any mods. Unfortunately, Starfield does not allow you to rename saved files . Therefore, remember the date you last saved the game to avoid losing your progress. 
How to install Starfield Mod using Vortex
Once the backup process is complete, you will need to install the Vortex Mod Manager. This is a mod manager managed by Nexus Mods that allows you to install Starfield mods. The mod is currently in development, but still requires Vortex to install. Here’s how it works:
- Visit the Nexus Mod website and download Vortex . It is a one-stop solution for modifying game files as the software detects the games installed on your system. Be sure to create a Nexus Mod account before proceeding with the installation.
- Install and launch Vortex on your PC. When you launch it for the first time, Starfield modding tools will pop up on the right side.
- Select Starfield and install the extension. The mod manager will ask you to log into your Nexus Mod account, so make sure you’re logged in.
- Then go to Games -> Select a game to manage and search for Starfield. Selecting this will allow you to install the mod.
- Next, return to the Nexus Mods website and open Starfield Mod. Check out the best Starfield mods here.
- Next, go to the “ Files ” tab on the MOD page.
- Then click the “Mod Manager Download” button to install the mod directly from Vortex.
- Your browser will prompt you to open the Vortex mod manager. Click “Open link” and install the mod accordingly.
- In this example, we installed StarUI and BetterHUD. These were discussed in the mod list linked above.
- Once Nexus Mods downloads the file. Go to the “mod” option on the left. Click on the mod to install it.
- Once installed, click on the “ Deploy Mods ” option to enable the mod in-game. You should now have the mod installed in your game.
If you follow the steps on the mod page correctly, you’ll successfully mod Starfield and be able to play with the new features, shaders, and other changes you’ve applied to the game. From here on, you will need to perform another step to activate the mod. 
Creating INI scripts to run Starfield Mods
Almost all mods rely on creating “ini” files in Starfield’s My Games folder to tweak the game. Without this “ini” extension, these mods cannot override the game’s instructions, nor can they mod the game itself. If you would like to do things yourself, such as manually changing the Starfield FOV, please follow the steps below.
- First, open File Explorer and go to My Documents .
- Next, search for and open the “ My Games ” folder.
- Under this folder you will find a Starfield folder. Open it.
- Next, click “View” at the top of the screen and enable the “Filename Extensions” option.
- Next, right-click inside this folder and create a new text file.
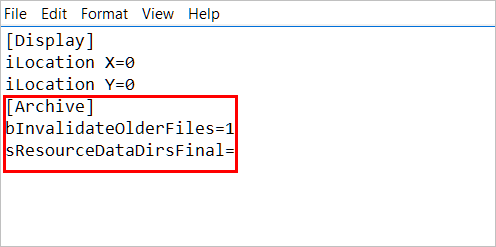
- Name this file “StarfieldCustom” and remember to add “.ini” at the end to change the extension.
From now on, each time a mod is installed, the mod author must write an ini script on the mod page in the instructions. Copy these scripts, open the StarfieldCustom file, and paste them inside. Be sure to save it. This changes the Starfiled file and should give you a new game experience different from vanilla.


![How to set up a Raspberry Pi web server in 2021 [Guide]](https://i0.wp.com/pcmanabu.com/wp-content/uploads/2019/10/web-server-02-309x198.png?w=1200&resize=1200,0&ssl=1)

")


 in Roblox")
")


")


")


")
