If the processor (CPU) is the brain, then the graphics card (GPU) is the heart of building a PC. GPUs are specifically designed to deliver superior performance for demanding graphics tasks such as high-end gaming and 3D rendering. Without a dedicated GPU, your PC will automatically use the GPU integrated into the CPU, which is less powerful. If you bought a new graphics card but don’t feel comfortable opening your PC case and installing your GPU, we’re here to help. Whether you’re upgrading your system’s graphics card or building a new PC, this guide will show you how to install a dedicated graphics card on your motherboard.
We will help you perfectly position your graphics card to avoid the risk of damaging your motherboard’s expansion slots. This is a step-by-step guide on how to install a GPU on your motherboard. If you’re upgrading your existing PC with a new graphics card, we’ve also added a section that explains how to remove your graphics card from your motherboard. That being said, let’s first look at the prerequisites. 
Things to remember before installing GPU

Gather the necessary tools
This may seem like an obvious requirement for installing a graphics card, but don’t forget to collect and organize the various tools you will use for this installation. You will need a Phillips screwdriver here. PC cases also come with screws specifically used for installing PCIe devices such as graphics cards. So don’t forget to collect them too before proceeding.
Make sure your work area is clean and grounded before handling PC components. We recommend using an anti-static bracelet to prevent static damage.
Check power compatibility
Be sure to check if your PSU has the appropriate number of power connectors to connect your graphics card. These are labeled “PCI-E”. Choosing the right power supply is an important step when upgrading your GPU. The power supply you have has a maximum power rating, which determines the type of graphics card you can install.
Using the power calculator , you will need to enter details about the graphics card and other system components installed in your PC. Once completed, the tool shows power measurements demanded from the power supply by various system components. Next, make sure you have 20-30% overhead above your calculated rating. This is the best way to run the system.
Does your PC case have enough space?
The graphics card you are installing may have a large footprint, such as the Founder’s Edition Nvidia GeForce RTX 4090. Check the dimensions of your GPU and the number of expansion slots you need to install it in your case. Even if your case supports a large GPU, some optimizations may be required to ensure that your GPU is not limited by your cooling settings.
Pre-install other PC components
You probably already have various components installed in your PC case, such as a motherboard and power supply. If you haven’t already, please read our dedicated guide linked above. Before installing the CPU cooler in your PC build, we also showed you how to easily install the CPU on the motherboard and apply thermal paste. 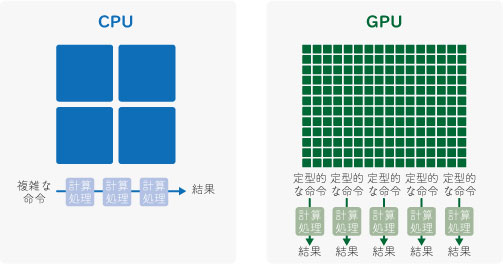


![How to set up a Raspberry Pi web server in 2021 [Guide]](https://i0.wp.com/pcmanabu.com/wp-content/uploads/2019/10/web-server-02-309x198.png?w=1200&resize=1200,0&ssl=1)

")


 in Roblox")
")


")


")


")
