Whether you use your PC’s graphics card for gaming, video editing, or 3D modeling, regularly updating your GPU drivers is important to maintaining the health and performance of your PC. New graphics driver updates add bug fixes, optimizations, and new features all the time. In some cases, newly released GPU drivers can make a big difference, eliminating abnormally high GPU usage issues and allowing new games to run more smoothly. So if you don’t know how to identify which graphics card you have and download the latest GPU drivers for it, we can help. In this guide, we have provided step-by-step instructions for updating Nvidia, AMD, or Intel GPU drivers on your Windows PC or laptop.
Two methods are included for each GPU manufacturer. One method is to manually download and install the latest driver update from the website. The second method installs a companion app that automatically downloads the latest GPU drivers when they’re available. But before we tell you how, let’s learn how to identify the make and model of your Windows 11 or 10 PC’s GPU. 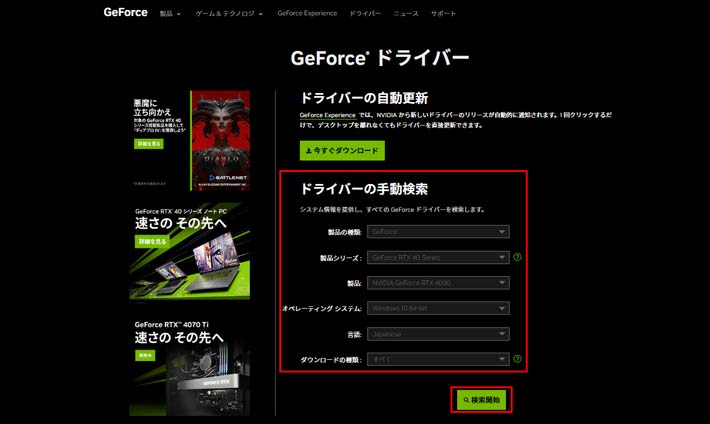
How to identify your graphics card
Before you update your GPU drivers, you need to know what graphics card your PC or laptop has. There are two easy ways to do this in Windows: Task Manager or System Information.
1. First, Task Manager will show you the GPU models present on your computer. To open it, use the Windows 11 keyboard shortcut “Ctrl + Shift + Esc”. Press these keys at the same time. Next, go to the “Performance” (second) tab from the left sidebar and you should see GPU 0, GPU 1, etc. depending on your PC. You will see the name of your GPU here, as shown below.
2. Alternatively, you can use the System Information app for this task. To access this app, press the Windows key and search for the utility’s name in the search menu. Click to open the app from the search results.
3. Now go to Components -> Multimedia -> Display . Here, you will see the graphics card model details in the right pane. If you have a dedicated and integrated graphics card, all information will be displayed here. For example, our MSI Titan GT77 HX review unit included an Nvidia GeForce RTX 4090 GPU. 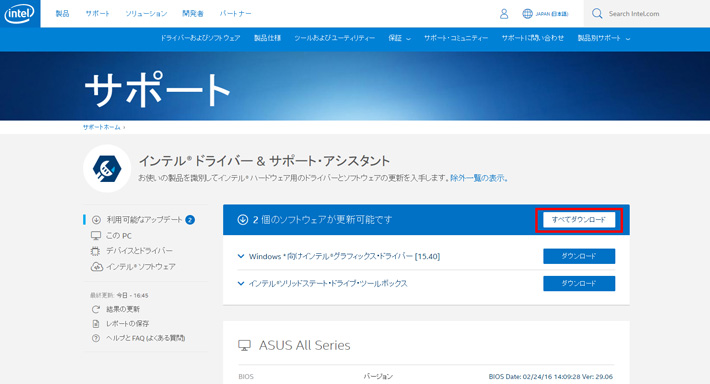
How to remove existing GPU drivers (optional)
Although this is not a required step, we recommend that you remove any existing GPU drivers that may cause problems on your Windows PC before installing new drivers. For this purpose, download and install the display driver uninstaller from the link here .
Once the download is complete, you will need to boot into Windows 11 Safe Mode. This guide will help you with this. Once you are in the safe mode environment, run the downloaded DDU utility and select your GPU manufacturer using the options menu on the right. Then click ” Clean and Restart ” on the left.
Once the entire process is complete, exit Safe Mode and start Windows again. You can then follow this guide to install the latest GPU drivers.
Instead of DDU, you can also choose a clean install or factory reset option when manually installing GPU drivers. The locations of these options are explained in the steps below. These options will completely erase your previous graphics drivers and settings. Removing existing GPU drivers is optional , but you can also remove them for a cleaner overall experience.
If you have an AMD graphics card, please note that removing the existing driver will also remove the AMD Radeon Adrenalin software and there will be no way to update the driver automatically. In that case, you should always manually download the latest drivers for your AMD GPU. However, for other GPU manufacturers, you can install drivers via Nvidia’s GeForce Experience or Intel’s DSA utility. 
How to update your Nvidia graphics card’s GPU driver
Automatically download the latest drivers
1. To automatically get the latest driver updates for your Nvidia GPU, launch NVIDIA GeForce Experience . If you don’t have this tool installed or have deleted it, download and install GeForce Experience from this link . If you start the software for the first time and the driver is not installed, you will see ” Driver Not Found “. Click Continue and the software will identify your graphics card model and download a compatible driver.
2. If you already have the driver preinstalled, go to the Drivers tab in Nvidia GeForce Experience. Then click Check for Updates to search for GPU driver updates. If an update is available, you will see its details and a Download button directly below it. Click this button to get the latest drivers for your Nvidia GPU.
3. The driver download will finish immediately. Once completed, you will be presented with two options : express installation and custom installation . You can choose either option depending on your preference, but please note that the ” Perform a Clean Install ” option is only available for custom installations. It basically erases previous settings and old drivers and installs new drivers in a new way. This is not necessary if you have already removed the old drive using DDU. Then click “Install” in the bottom right corner to start installing the driver.
Note:
The computer screen goes black multiple times while the software is updating the GPU driver. However, if you have new GPU drivers installed, there is no need to worry as this is completely normal.
4. You are now done. Your Nvidia GeForce GTX or RTX graphics driver was successfully updated through GeForce Experience. Once the driver update is complete, click Close and return to using your PC. Wasn’t it easy?
Manually download and update GPU drivers
1. To manually update your GPU driver, first visit Nvidia’s driver download website linked here . Here you need to specify the GPU manufacturer and model using the drop-down menu. Most people should select ” GeForce ” for the product type. Next, you need to select which generation your graphics card belongs to under ‘Product Series’. As well as Nvidia Quadro and Workstation RTX cards, you’ll see a different list of laptops with the suffix “notebook” for each generation.
2. Next, select the GPU model you have in the Product section. Once done, select your OS and download type. If your use case is primarily gaming, choose Game-Ready Driver (GRD). However, if your PC is primarily used for professional workloads, you can choose Studio Drivers (SD) instead. The last option is language, which you can set to your preference. Once done, click Search to view the latest drivers for your graphics card.
3. On the next page, click Download (you may need to click Download again on the confirmation page) to begin downloading the driver for your graphics card. If you want to check driver and GPU compatibility, go to the Supported Products section and see if your graphics card model is listed.
4. Once downloaded, open the driver update file and follow the on-screen instructions. At some point during setup, you will be asked to perform a custom or express installation . Please choose the one you like. However, please note that if you choose a custom installation, you will only see the option to “Perform a clean installation ”. Then click Next to continue the setup and the GPU driver installation will begin.
5. Voila! The latest Nvidia graphics drivers have been successfully installed on your Windows PC. Click Close to exit setup and launch GeForce Experience. If you want, you can also check “Create a desktop shortcut for Nvidia GeForce Experience.” As explained above, you can now use this utility to automatically update your GPU drivers. 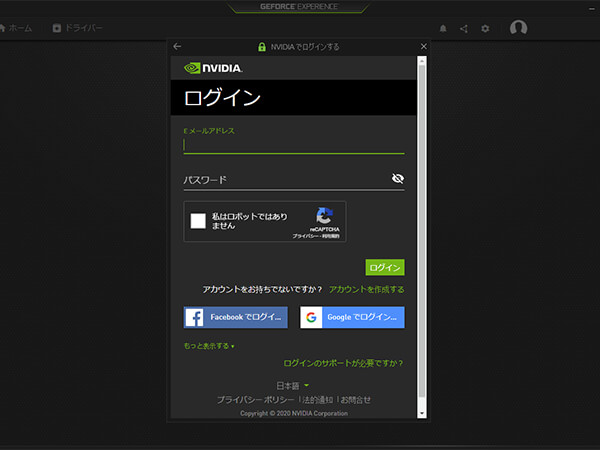
How to update GPU drivers for AMD Radeon graphics cards
Automatically download the latest drivers
To get automatic AMD GPU driver updates, your computer must have an existing driver installed. If you accidentally delete it, you’ll need to use the manual section of the guide to undo it and re-enable automatic driver updates.
1. Open AMD Radeon Settings by right-clicking the desktop and selecting AMD Radeon Software from the context menu. To access this option, you need to click Show more options in Windows 11. If the utility is not running, press the Windows key and search for the same.
2. Within the Radeon software, go to the System tab. Now, click Check for Updates to start searching for the latest drivers for your AMD Radeon GPU. You can also have the utility check for updates periodically by setting the toggle to ” Automatic .”

3. After the software downloads the latest driver, follow the onscreen instructions to complete the installation of the new driver for your graphics card. That’s it. Your AMD Radeon graphics card driver has been successfully updated.
Manually download and update GPU drivers
To manually update your AMD graphics driver, first visit AMD’s Drivers and Support website linked here . You can search for GPU models directly or use the list to filter to find GPU models. So here’s how it works:
1. Learn how to filter out the GPU models you want. Most people should select Graphics , but note that the Radeon PRO Workstation GPU’s drivers are under Professional Graphics. Also, if you are looking for GPU drivers for integrated Radeon graphics or APU systems, please select the “Processor with Graphics” option.
2. Next, you need to select the appropriate generation to which your graphics card belongs in the next two cascading lists. Finally, AMD lists various AMD GPU models for the selected generation. So find the appropriate model, click on it, and click Submit .
3. On the next page, click the plus (+) based on your operating system and click Download next to AMD Software: Adrenalin Edition to begin downloading the drivers for your GPU.
4. Next, open the driver setup file once the download is complete. Follow the on-screen instructions to install the driver, but expand the “Additional Options” menu if it appears in the installer. Here you can select the “ Factory Reset ” option if you wish. This will completely erase the previous driver including its settings. When complete, click Install . AMD Radeon GPU drivers will be updated/installed soon.
5. The AMD GPU driver has now been successfully updated manually. At the end of driver setup, you will be asked to restart your system. There, click ” Restart ” and the utility will be available after rebooting. You can now open the AMD Radeon Adrenalin software and enable automatic GPU driver updates as shown in the previous section.
How to update the GPU driver for your Intel Arc graphics card
Automatically download the latest drivers
1. First, go to Intel’s website and download Intel Driver & Support Assistant (DSA). Click the “Download Now” button on the website.
2. Once the download is complete, open the setup file and follow the on-screen instructions to install the utility on your system. Eventually, setup will require you to restart your system.
3. Then press the Windows key and search for “Intel Driver & Support Assistant” and launch the software from the search results. When you navigate to a website in your browser, the utility scans your system for Intel hardware components that need updating. Driver updates for GPU and other hardware have been found as shown in the image below.
However, if you only want to update the graphics driver, click Download next to it. Once the download is complete, you will see an “Install” button that you need to click. Check the warning ” I understand and want to continue ” to continue.
4. Intel Driver & Support Assistant will install the latest Arc GPU driver updates. Follow the on-screen instructions until you see the component you want to install. Now, check the ” Perform a clean install ” option and the existing driver will be removed along with its settings. However, if you have already used DDU to completely remove previous drivers, you do not need to enable this. Then click ” Start ” to install the new driver update on your Windows PC.
5. The Intel Arc graphics card driver has now been successfully installed. Once the driver installation is complete, click the Restart Now button to restart your PC.
Manually download and update Intel GPU drivers
1. To manually update the drivers for your Intel Arc GPU, you must first visit Intel’s driver and software download website linked here . You must enter the model name of your Intel GPU here. However, if you want to update your integrated graphics driver, you should search by processor name instead. If you’re not sure, scroll up this guide to learn how to identify your graphics card model.
In this tutorial, let’s download the latest driver update for Intel Arc A770 GPU. Type the name of your GPU or CPU in the text box on this website, then press Enter.
2. Next, you will see different results for your search query. Here, look for one that lists your GPU generation, or use the options in the left sidebar to exclude results. In our case, we found the correct driver for Intel Arc in the options highlighted below. It clearly says “For Intel Arc A-series graphics.” Once you find your GPU driver, click the Download button next to it.
3. Once the driver update is downloaded, open the file. Then follow the on-screen instructions and click Start to update your Intel Arc graphics card driver. You can also choose to perform a clean installation using the installer, as described in the section above.
4. The Intel graphics driver installation is now complete. Click Restart Now in the installer to finish the process. When you start Windows again, your PC will be able to use the updated Intel GPU driver.
These are the different ways to update your graphics drivers to the latest version on your Windows PC. If you followed the steps above, you have successfully updated your Nvidia, AMD Radeon, or Intel Arc GPU graphics driver. In addition to manually downloading driver updates, we also include instructions to automate the post-download process. This ensures that you get the latest features and security updates as they are released. Now that you’ve updated your GPU drivers, check out this great free tool to update/install drivers on your Windows PC. Perhaps you’re considering overclocking your graphics card to maximize its performance potential? Read this GPU overclocking guide to find out how. If you have any doubts or issues while updating GPU drivers, let us know in the comments below.
We recommend updating your graphics drivers through the manufacturer’s tools or website. Windows Update typically does not retrieve the latest GPU drivers and skips installing various components of graphics drivers.
Although it is not necessary to update your GPU driver, it is highly recommended. Updated GPU drivers bring new game optimizations, bug fixes, and new features.
To check whether your graphics drivers are up to date, you can use manufacturer-provided software such as NVIDIA GeForce Experience, AMD’s Radeon Software, or Intel’s Driver & Support Assistant. These programs help you get new driver updates automatically.
Yes, Windows 11 has Windows Update turned on by default and always tries to update GPU drivers. However, it usually does not update to the latest driver version.


![How to set up a Raspberry Pi web server in 2021 [Guide]](https://i0.wp.com/pcmanabu.com/wp-content/uploads/2019/10/web-server-02-309x198.png?w=1200&resize=1200,0&ssl=1)

")


 in Roblox")
")


")


")


")
