Having a default product error page from Apache HTTP or Nginx is unattractive and reveals version information, leading to information disclosure vulnerabilities.
If you haven’t implemented custom error pages in your web application, you should consider doing so for a variety of reasons, including:
- Branding – Display a customized message with your brand logo and a few lines of text to make visitors aware of the issue and provide a link to contact your respective team.
- Vulnerabilities – If you are working on a PCI DSS compliant environment, you should consider remediating information disclosure vulnerabilities in the default product error page.
- Better UI – It’s all about improving the user experience, and error pages can provide that too. Example – If the content requested by the user is not present, the web server will serve a 404 default error page and the user will most likely end the session. Why not have a custom page where users can search or view related items and perform appropriate navigation?
Sounds good?
In this way, we are confident that you will be able to retain your visitors, keep them browsing your website, and improve your bounce rate.
Still not convinced?
Let’s take a look…
This is Nginx’s default “404 not found” page

What should you do if you see this page?
Probably close it.
And this is the custom “404” page I implemented.

Does it look pretty good?
You’ll probably want to visit the “home page” or click on one of the searches listed below. That’s how custom pages can help.
Now that you know the benefits, it’s time to implement them. You can include custom pages for various HTTP status code events. I believe the following are essential.
- 404 The page you were looking for could not be found
- 403 Forbidden
- 500 Internal Server Error
- 503 – Service unavailable
- 504 gateway timeout
Prerequisites
I assume you have already created a custom page. If you need a 404 image, you can get it from Elements.
Implementation in Apache HTTP
There are multiple ways to do this. Example – You can do this using Rewrite or ErrorDocument directives. Explains how to use the ErrorDocument directive.
- Login to Apache HTTP server
- Navigate to the apache conf folder where the httpd.conf file is located.
- Create a backup of the httpd.conf file.
- Modify httpd.conf and add
ErrorDocumentas below.
 ErrorDocument 404 /path/of/custom/error/file
ErrorDocument 403 /path/of/custom/error/file
ErrorDocument 500 /path/of/custom/error/file
ErrorDocument 503 /path/of/custom/error/file
ErrorDocument 504 /path/of/custom/error/file
Save httpd.conf and restart the Apache server.
If you try to access something that doesn’t exist, you should see a custom error page instead of the default error page.
Note : You can also redirect to other URLs if you encounter these HTTP status return codes. For redirects, just add the URL next to each code like below.
 ErrorDocument 404 https://.com/errorpage
ErrorDocument 403 https://.com/errorpage
ErrorDocument 500 https://.com/errorpage
ErrorDocument 503 https://.com/errorpage
ErrorDocument 504 https://.com/errorpage 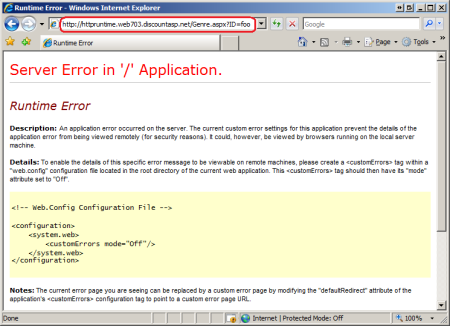
Implementation with Nginx
- Log in to your Nginx server
- Navigate to the nginx.conf file location
- As usual, take a backup of your conf file and add the following below the http block:
 error_page 404 /path/of/custom/error/file;
error_page 403 /path/of/custom/error/file;
error_page 500 /path/of/custom/error/file;
error_page 503 /path/of/custom/error/file;
error_page 504 /path/of/custom/error/file;
Save the file and restart Nginx for this to take effect.
conclusion
This small change can have a big impact, so why not implement it?


![How to set up a Raspberry Pi web server in 2021 [Guide]](https://i0.wp.com/pcmanabu.com/wp-content/uploads/2019/10/web-server-02-309x198.png?w=1200&resize=1200,0&ssl=1)

")


 in Roblox")
")


")


")


")
