Sharding is the process of dividing large data sets into chunks of smaller data sets across multiple MongoDB instances in a distributed environment.
What is sharding?
MongoDB sharding provides a scalable solution for storing large amounts of data across many servers, rather than storing large amounts of data on a single server.
In reality, it is not practical to store exponentially growing data on a single machine. Querying large amounts of data stored on a single server can result in high resource utilization and unsatisfactory read and write throughput.
Basically, there are two types of scaling methods that exist to handle growing data in a system.
- vertical
- horizontal
Vertical scaling increases the performance of a single server by adding a more powerful processor, upgrading RAM, or adding disk space to the system. However, in real-world use cases with existing technology and hardware configurations, there are potential implications of applying vertical scaling.
Horizontal scaling works by adding servers and distributing the load across multiple servers. Each machine processes a subset of the entire dataset, providing a more efficient and cost-effective solution than deploying high-end hardware. However, it requires additional maintenance of a complex infrastructure with a large number of servers.
Mongo DB sharding works based on horizontal scaling techniques.
Sharding components
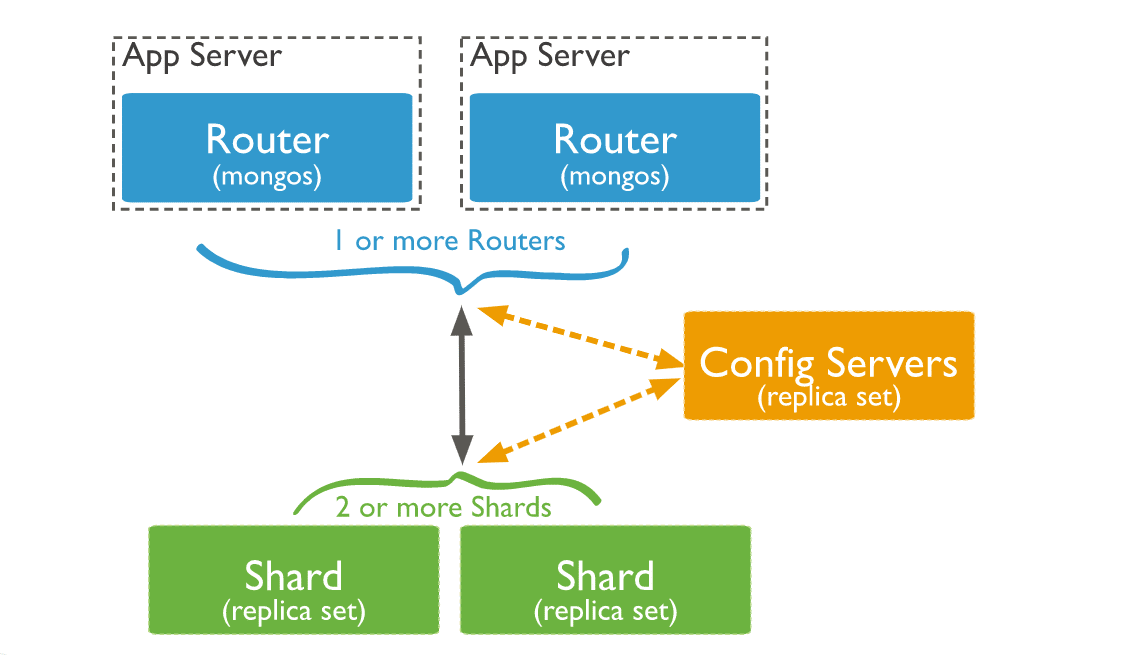
To achieve sharding with MongoDB, you need the following components:
A Shard is a Mongo instance that processes a subset of your original data. Shards must be deployed into replica sets.
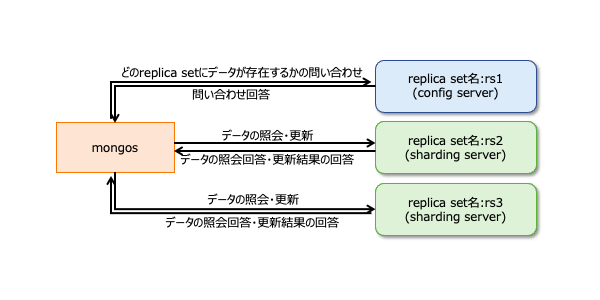
Mongos is a Mongo instance that acts as an interface between client applications and sharded clusters. Acts as a query router to the shards.
Config Server is a Mongo instance that stores metadata information and configuration details for your cluster. MongoDB requires configuration servers to be deployed as replica sets.
sharding architecture
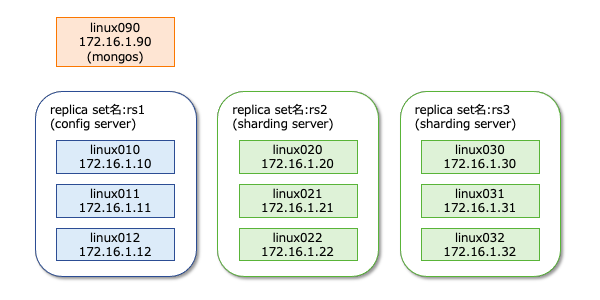
A MongoDB cluster consists of many replica sets.
Each replica set consists of at least three mongo instances. A sharded cluster consists of multiple mongo shard instances, and each shard instance operates within a shard replica set. Applications interact with Mongos, and Mongos communicates with shards . Therefore, with sharding, applications do not interact directly with shard nodes. The query router distributes subsets of data across shard nodes based on the shard key.

Implementing sharding
Follow the steps below to shard
Step 1
- Start the configuration servers in the replica set and enable replication between them.
mongod --configsvr --port 27019 --replSet rs0 --dbpath C:\data\data1 --bind_ip localhost
mongod --configsvr --port 27018 --replSet rs0 --dbpath C:\data\data2 --bind_ip localhost
mongod --configsvr --port 27017 --replSet rs0 --dbpath C:\data\data3 --bind_ip localhost
Step 2
- Initialize the replica set on one of the configuration servers.
rs.initiate( { _id : "rs0", configsvr: true, members: [ { _id: 0, host: "IP:27017" }, { _id: 1, host: "IP:27018" }, { _id: 2, host: "IP:27019" } ] })
 rs.initiate( { _id : "rs0",  configsvr: true,  members: [   { _id: 0, host: "IP:27017" },   { _id: 1, host: "IP:27018" },   { _id: 2, host: "IP:27019" }    ] })
{
        "ok" : 1,
        "$gleStats" : {
                "lastOpTime" : Timestamp(1593569257, 1),
                "electionId" : ObjectId("000000000000000000000000")
        },
        "lastCommittedOpTime" : Timestamp(0, 0),
        "$clusterTime" : {
                "clusterTime" : Timestamp(1593569257, 1),
                "signature" : {
                        "hash" : BinData(0,"AAAAAAAAAAAAAAAAAAAAAAAAAAA="),
                        "keyId" : NumberLong(0)
                }
        },
        "operationTime" : Timestamp(1593569257, 1)
}
Step 3
- Start sharding servers in a replica set and enable replication between servers.
mongod --shardsvr --port 27020 --replSet rs1 --dbpath C:\data\data4 --bind_ip localhost
mongod --shardsvr --port 27021 --replSet rs1 --dbpath C:\data\data5 --bind_ip localhost
mongod --shardsvr --port 27022 --replSet rs1 --dbpath C:\data\data6 --bind_ip localhost
MongoDB initializes the first sharding server as a primary, and to move the primary sharding server, use the movePrimary method.
Step 4
- Initialize a replica set on one of the sharded servers.
rs.initiate( { _id : "rs0", members: [ { _id: 0, host: "IP:27020" }, { _id: 1, host: "IP:27021" }, { _id: 2, host: "IP:27022" } ] })
 rs.initiate( { _id : "rs0",  members: [   { _id: 0, host: "IP:27020" },   { _id: 1, host: "IP:27021" },   { _id: 2, host: "IP:27022" }    ] })
{
        "ok" : 1,
        "$clusterTime" : {
                "clusterTime" : Timestamp(1593569748, 1),
                "signature" : {
                        "hash" : BinData(0,"AAAAAAAAAAAAAAAAAAAAAAAAAAA="),
                        "keyId" : NumberLong(0)
                }
        },
        "operationTime" : Timestamp(1593569748, 1)
}
Step 5
- Start mangos on a sharded cluster
mongos --port 40000 --configdb rs0/localhost:27019,localhost:27018, localhost:27017
Step 6
- Connect to mongo root server
mongo --port 40000
- Next, add a sharding server.
sh.addShard( "rs1/localhost:27020,localhost:27021,localhost:27022")
 sh.addShard( "rs1/localhost:27020,localhost:27021,localhost:27022")
{
        "shardAdded" : "rs1",
        "ok" : 1,
        "operationTime" : Timestamp(1593570212, 2),
        "$clusterTime" : {
                "clusterTime" : Timestamp(1593570212, 2),
                "signature" : {
                        "hash" : BinData(0,"AAAAAAAAAAAAAAAAAAAAAAAAAAA="),
                        "keyId" : NumberLong(0)
                }
        }
}
Step 7
- In the mongo shell, enable DB and collection sharding.
- Enable sharding on DB
sh.enableSharding("geekFlareDB")
 sh.enableSharding("geekFlareDB")
{
        "ok" : 1,
        "operationTime" : Timestamp(1591630612, 1),
        "$clusterTime" : {
                "clusterTime" : Timestamp(1591630612, 1),
                "signature" : {
                        "hash" : BinData(0,"AAAAAAAAAAAAAAAAAAAAAAAAAAA="),
                        "keyId" : NumberLong(0)
                }
        }
}
Step 8
- To shard, you need the collection’s shard key (described later in this article).
Syntax : sh.shardCollection("dbName.collectionName", { "key" : 1 } )<br>
 sh.shardCollection("geekFlareDB.geekFlareCollection", { "key" : 1 } )
{
        "collectionsharded" : "geekFlareDB.geekFlareCollection",
        "collectionUUID" : UUID("0d024925-e46c-472a-bf1a-13a8967e97c1"),
        "ok" : 1,
        "operationTime" : Timestamp(1593570389, 3),
        "$clusterTime" : {
                "clusterTime" : Timestamp(1593570389, 3),
                "signature" : {
                        "hash" : BinData(0,"AAAAAAAAAAAAAAAAAAAAAAAAAAA="),
                        "keyId" : NumberLong(0)
                }
        }
}
If the collection does not exist, create it as follows:
 db.createCollection("geekFlareCollection")
{
        "ok" : 1,
        "operationTime" : Timestamp(1593570344, 4),
        "$clusterTime" : {
                "clusterTime" : Timestamp(1593570344, 5),
                "signature" : {
                        "hash" : BinData(0,"AAAAAAAAAAAAAAAAAAAAAAAAAAA="),
                        "keyId" : NumberLong(0)
                }
        }
}
Step 9
Insert data into the collection. The Mongo logs will start to increase, indicating that the balancer is working and trying to balance the data between the shards.
Step 10
The final step is to check the sharding status. You can check the status by running the following command on the Mongos root node:
Sharding status
Check the sharding status by running the following command on the mongo root node:
sh.status()
 mongos> sh.status()
--- Sharding Status ---
  sharding version: {
        "_id" : 1,
        "minCompatibleVersion" : 5,
        "currentVersion" : 6,
        "clusterId" : ObjectId("5ede66c22c3262378c706d21")
  }
  shards:
        {  "_id" : "rs1",  "host" : "rs1/localhost:27020,localhost:27021,localhost:27022",  "state" : 1 }
  active mongoses:
        "4.2.7" : 1
  autosplit:
        Currently enabled: yes
  balancer:
        Currently enabled:  yes
        Currently running:  no
        Failed balancer rounds in last 5 attempts:  5
        Last reported error:  Could not find host matching read preference { mode: "primary" } for set rs1
        Time of Reported error:  Tue Jun 09 2020 15:25:03 GMT+0530 (India Standard Time)
        Migration Results for the last 24 hours:
                No recent migrations
  databases:
        {  "_id" : "config",  "primary" : "config",  "partitioned" : true }
                config.system.sessions
                        shard key: { "_id" : 1 }
                        unique: false
                        balancing: true
                        chunks:
                                rs1     1024
                        too many chunks to print, use verbose if you want to force print
        {  "_id" : "geekFlareDB",  "primary" : "rs1",  "partitioned" : true,  "version" : {  "uuid" : UUID("a770da01-1900-401e-9f34-35ce595a5d54"),  "lastMod" : 1 } }
                geekFlareDB.geekFlareCol
                        shard key: { "key" : 1 }
                        unique: false
                        balancing: true
                        chunks:
                                rs1     1
                        { "key" : { "$minKey" : 1 } } -->> { "key" : { "$maxKey" : 1 } } on : rs1 Timestamp(1, 0)
                geekFlareDB.geekFlareCollection
                        shard key: { "product" : 1 }
                        unique: false
                        balancing: true
                        chunks:
                                rs1     1
                        { "product" : { "$minKey" : 1 } } -->> { "product" : { "$maxKey" : 1 } } on : rs1 Timestamp(1, 0)
        {  "_id" : "test",  "primary" : "rs1",  "partitioned" : false,  "version" : {  "uuid" : UUID("fbc00f03-b5b5-4d13-9d09-259d7fdb7289"),  "lastMod" : 1 } }

mongos> 
data delivery
Mongos routers load balance between shards based on shard keys, distributing data evenly. The balancer is activated.
The main components for distributing data across shards are:
- The balancer is responsible for balancing subsets of data across sharded nodes. The balancer runs when the Mongos server starts distributing load between shards. Once started, Balancer distributed the data more evenly. To check the balancer state
<code class="language-markup">sh.isBalancerRunning()<strong>sh.status()</strong>,sh.getBalancerState(), or sh.isBalancerRunning() .
 mongos> sh.isBalancerRunning()
true
mongos>
or
 mongos> sh.getBalancerState()
true
mongos>
After inserting data, you can notice activity in the Mongos daemon, such as moving some chunks of a particular shard. This means that the balancer is working to balance the data between the shards. Running a balancer can cause performance issues. Therefore, it is recommended to run the balancer within a specific balancer window .
 mongos> sh.status()
--- Sharding Status ---
  sharding version: {
        "_id" : 1,
        "minCompatibleVersion" : 5,
        "currentVersion" : 6,
        "clusterId" : ObjectId("5efbeff98a8bbb2d27231674")
  }
  shards:
        {  "_id" : "rs1",  "host" : "rs1/127.0.0.1:27020,127.0.0.1:27021,127.0.0.1:27022",  "state" : 1 }
        {  "_id" : "rs2",  "host" : "rs2/127.0.0.1:27023,127.0.0.1:27024,127.0.0.1:27025",  "state" : 1 }
  active mongoses:
        "4.2.7" : 1
  autosplit:
        Currently enabled: yes
  balancer:
        Currently enabled:  yes
        Currently running:  yes
        Failed balancer rounds in last 5 attempts:  5
        Last reported error:  Could not find host matching read preference { mode: "primary" } for set rs2
        Time of Reported error:  Wed Jul 01 2020 14:39:59 GMT+0530 (India Standard Time)
        Migration Results for the last 24 hours:
                1024 : Success
  databases:
        {  "_id" : "config",  "primary" : "config",  "partitioned" : true }
                config.system.sessions
                        shard key: { "_id" : 1 }
                        unique: false
                        balancing: true
                        chunks:
                                rs2     1024
                        too many chunks to print, use verbose if you want to force print
        {  "_id" : "geekFlareDB",  "primary" : "rs2",  "partitioned" : true,  "version" : {  "uuid" : UUID("a8b8dc5c-85b0-4481-bda1-00e53f6f35cd"),  "lastMod" : 1 } }
                geekFlareDB.geekFlareCollection
                        shard key: { "key" : 1 }
                        unique: false
                        balancing: true
                        chunks:
                                rs2     1
                        { "key" : { "$minKey" : 1 } } -->> { "key" : { "$maxKey" : 1 } } on : rs2 Timestamp(1, 0)
        {  "_id" : "test",  "primary" : "rs2",  "partitioned" : false,  "version" : {  "uuid" : UUID("a28d7504-1596-460e-9e09-0bdc6450028f"),  "lastMod" : 1 } }

mongos>- The shard key determines the logic for distributing documents in a shard collection across shards. A shard key can be an indexed field or an indexed composite field that must be present in every document in the collection being inserted. Data is divided into chunks, and each chunk is associated with a range-based shard key. Based on the range query, the router decides in which shard to store the chunk.
Shard keys can be selected by considering five properties:
- cardinality
- Write distribution
- Read distribution
- read targeting
- Reading regional characteristics
An ideal shard key allows MongoDB to evenly distribute the load across all shards. Choosing the right shard key is very important.
Delete a shard node
Before removing a shard from a cluster, users must ensure that data can be safely migrated to the remaining shards. MongoDB handles the secure draining of data to other shard nodes before deleting the required shard nodes.
Run the following command to remove the required shards.
Step 1
First, you need to determine the hostname of the shard you want to delete. The following command lists all the shards present in the cluster and the state of the shards.
db.adminCommand( { listShards: 1 } )
 mongos> db.adminCommand( { listShards: 1 } )
{
        "shards" : [
                {
                        "_id" : "rs1",
                        "host" : "rs1/127.0.0.1:27020,127.0.0.1:27021,127.0.0.1:27022",
                        "state" : 1
                },
                {
                        "_id" : "rs2",
                        "host" : "rs2/127.0.0.1:27023,127.0.0.1:27024,127.0.0.1:27025",
                        "state" : 1
                }
        ],
        "ok" : 1,
        "operationTime" : Timestamp(1593572866, 15),
        "$clusterTime" : {
                "clusterTime" : Timestamp(1593572866, 15),
                "signature" : {
                        "hash" : BinData(0,"AAAAAAAAAAAAAAAAAAAAAAAAAAA="),
                        "keyId" : NumberLong(0)
                }
        }
}
Step 2
Remove the required shards from the cluster by issuing the following command: Once published, the balancer handles the removal of chunks from the draining shard node and balances the distribution of remaining chunks among the remaining shard nodes.
db.adminCommand( { removeShard: "shardedReplicaNodes" } )
 mongos> db.adminCommand( { removeShard: "rs1/127.0.0.1:27020,127.0.0.1:27021,127.0.0.1:27022" } )
{
        "msg" : "draining started successfully",
        "state" : "started",
        "shard" : "rs1",
        "note" : "you need to drop or movePrimary these databases",
        "dbsToMove" : [ ],
        "ok" : 1,
        "operationTime" : Timestamp(1593572385, 2),
        "$clusterTime" : {
                "clusterTime" : Timestamp(1593572385, 2),
                "signature" : {
                        "hash" : BinData(0,"AAAAAAAAAAAAAAAAAAAAAAAAAAA="),
                        "keyId" : NumberLong(0)
                }
        }
}
Step 3
Run the same command again to check the status of the drain shard.
db.adminCommand( { removeShard: "rs1/127.0.0.1:27020,127.0.0.1:27021,127.0.0.1:27022" } )
You need to wait until the data has been drained. The msg and state fields indicate whether the data has been drained, as follows:
 "msg" : "draining ongoing",
"state" : "ongoing",
You can also check the status using the command sh.status() . Deleted shard nodes are not reflected in the output. However, if a drain is in progress, the shard node’s drain status will be true.
Step 4
Continue checking the drain status using the same command as above until the desired shards are completely removed.
Once complete, the command output will reflect the message and status that it is complete.
 "msg" : "removeshard completed successfully",
"state" : "completed",
"shard" : "rs1",
"ok" : 1,
Step 5
Finally, we need to check the remaining shards in the cluster. To check the status, enter <strong>sh.status()</strong> or <strong>db.adminCommand( { listShards: 1 } )</strong> .
 mongos> db.adminCommand( { listShards: 1 } )
{
        "shards" : [
                {
                        "_id" : "rs2",
                        "host" : "rs2/127.0.0.1:27023,127.0.0.1:27024,127.0.0.1:27025",
                        "state" : 1
                }
        ],
        "ok" : 1,
        "operationTime" : Timestamp(1593575215, 3),
        "$clusterTime" : {
                "clusterTime" : Timestamp(1593575215, 3),
                "signature" : {
                        "hash" : BinData(0,"AAAAAAAAAAAAAAAAAAAAAAAAAAA="),
                        "keyId" : NumberLong(0)
                }
        }
}
Here you can see that the deleted shard is no longer present in the list of shards.
Benefits of sharding for replication
- In replication, the primary node handles all write operations, but secondary servers must maintain backup copies or perform read-only operations. However, sharding using replica sets distributes the load across a large number of servers.
- A replica set is limited to 12 nodes, but there is no limit to the number of shards.
- Replication requires high-end hardware or verticle scaling to handle large datasets, which is too expensive compared to adding more servers with sharding.
- Replication allows you to improve read performance by adding slave/secondary servers, while sharding improves both read and write performance by adding shard nodes.
Sharding limits
- Sharded clusters do not support unique indexing across shards until the unique index is prefixed with the full shard key.
- All update operations in a sharded collection on one or more documents require the shard key or _id field to be included in the query.
- If the collection size does not exceed the specified threshold, you can shard the collection. This threshold can be estimated based on the average size of all shard keys and the configured chunk size.
- Sharding consists of operational limits on the maximum collection size or number of splits.
- Choosing the wrong shard key will impact performance.
conclusion
MongoDB offers built-in sharding to implement large databases without compromising performance. I hope the above helps you set up MongoDB sharding. Next, you may want to familiarize yourself with some of the commonly used MongoDB commands.


![How to set up a Raspberry Pi web server in 2021 [Guide]](https://i0.wp.com/pcmanabu.com/wp-content/uploads/2019/10/web-server-02-309x198.png?w=1200&resize=1200,0&ssl=1)

")


 in Roblox")
")


")


")


")
